Wednesday, November 12, 2014

Halloween 2014: Lala Lucy and Lil Squirt


I know.
Halloween is so two weeks ago.
BUT....I must share the girls costumes with you!  Because they're so much fun!
And if by chance you have a LalaLoopsy loving girl at your house, you can tuck this post away till Halloween rolls around again.

Okay.
Here's part 2 of our Halloween.
Unlike Owen, Lucy knew what she wanted to be months ago....in fact, she told me in the summer that she and her friends were going to dress as Lalaloopsies. 

They just love these little dolls.
They can't get enough of them!   I keep a small bag of them in my purse and it keeps the kids occupied when we go out to eat---even Owen.  He likes to be Patch.
For her birthday, we got Lucy the collectors book and she looked at that thing for a month straight (now we've been giving copies to friends on their birthday!)
One thing I love about these little dolls is their story---it's all about sewing and having your own unique personality.  Lalaloopsies are rag dolls that came to life when their last stitch was sewn.   And their outfits are repurposed from other items.  Fantastic!

Of course picking WHICH doll to be isn't easy....there are so many cute ones. 
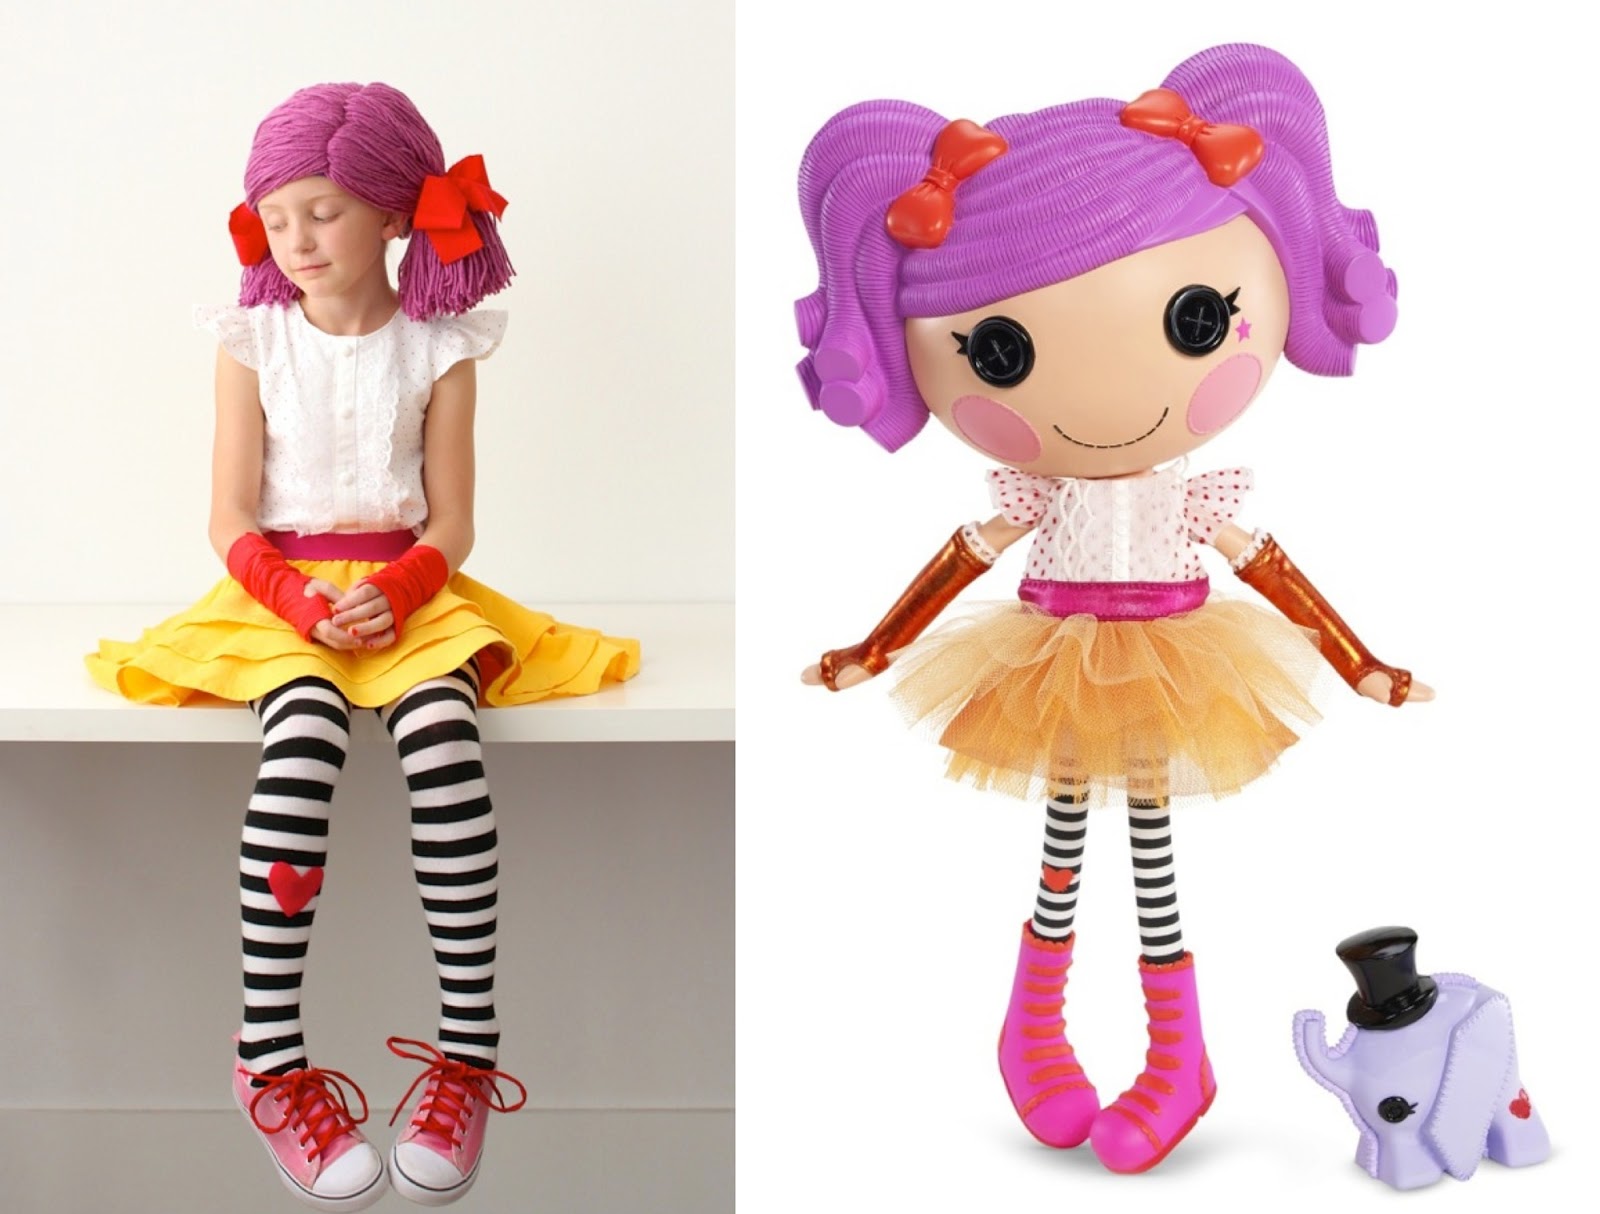
But Lucy decided on Peanut---Peanut Big Top.
According to the collector's guide (heh heh), Peanut has a special talent for making people laugh, and she's never afraid to show her silly side.  And her costume is made from an old clown costume.
I love it!

When it came to sewing Lucy's costume, Lucy had the whole thing figured out....
Mom you can just make me one of those circle skirts, and a little polka dot shirt like those jammies you made me, and then some tights! 
Great plan Luce!  Great plan.
And so the week before Halloween, it all came together!
And she totally loved it...which is always the best reward for your labors.
Happy, excited kids.
Here's what we did....
I made a triple-layer circle skirt using 100% quilter's cotton.  I wanted it to be a little stiffer---so the layers would stand out without needing a petticoat underneath---and the fabric worked great.  You could also make Peanut's skirt from tulle (if you look online, there are various versions of her outfit and various ways you could make it)
For the shirt I used the First Day Dress pattern, adding some ruffled flutter sleeves and a lacy placket to the front.  I love it when I have patterns all ready to go for this stuff! 
And I really love how the shirt and skirt turned out.  She might actually wear these again as normal clothes.  And.... I kinda want that shirt for myself!

Now the key to really looking like a Lalaloopsy is the yarn wig....which I'm going to have share more about in a separate tutorial.  It's not hard to make, but they are some tips that will help.  To get you started: it's a knit beanie hat underneath, with yarn sewn into a part on top.  It's not perfect and every once in a while you could see her bits of her beanie.  But overall it worked great!
Then we threw it all together with some pink shoes, red laces, a pair of tights (I purchased these) with a heart on the right knee (we just taped a felt heart on because sewing it in place was too complicated.  Ding!)
And we added a pair of fingerless gloves.
I just cut two rectangles of fabric, folded the tops and bottom under and sewed them in a tube. Then I cut a small hole for the thumb.  No hemming or finishing.  And she actually lost this pair when she wore the outfit to dance class, so I whipped up another pair in red fabric and liked those even better. 
And there you go!  Just as she had planned.
And then of course,
there's this girl.

YES!  We finally dressed Clara in a real costume!

Cause did you know that Peanut has a little sister???
She's Squirt Lil' Top!  Too perfect.

And she wears this darling romper, also made from an old clown costume (according to legend).   So I came up with a make-shift romper using the KID shorts pattern and the circle skirt tutorial for the collar, and it worked out pretty well.  
I made yarn pom-poms using my tutorial here, then measured felt circles the size of the poms and sewed them to the romper first, and then hot glued the pom-poms to the felt.  
I wish I had added one extra inch in the length, cause it's a bit snug on her bum and shoulders....but it only makes her more endearing.
Then I sewed up a quick pair of leggings, added the wig and shoes and shew was ready to go!


One Lala Lucy and one Lil' Squirt.
Sounds about right.
Oh I la la LOVE you girls! 
I hope you stay friends forever.

And that is officially a Halloween wrap.
On to the other holidays....


Monday, November 3, 2014

tons of free patterns, for anyone

It's officially November!
Time to start thinking about Christmas, and presents, and handmade gifts?
Mmmm.
Maybe not yet.
How about just sewing for fun!
For you....and for your man?
YES.


You see, you've heard me talk about the fantastic classes on Craftsy before (here and here)...but did you know they have patterns on there too?  Tons of FREE Patterns??
What?
Where have I been?
I'll chalk this up as one of those duh-Dana moments.
Cause who doesn't love free stuff?   I'm sure I had you at the Simple Skirt pattern and Men's Bow Tie pattern above?  Yea.  I need those in my life.

And I probably need some Polka Dot Nighties for my girls and an Ethel Tote Bag.
Cute + Cute.
If you want to search for FREE patterns on the Craftsy site, it's easy.

I clicked the pattern tab at the top of the site. Then you can click on whatever category you'd like----sewing, crocheting, knitting, jewelry, etc.  Then I clicked Top 20 FREE Sewing Patterns, and all sorts of fun things popped up!  You could also type in "free patterns" in the search box for more than 20 options, or type in some of the pattern names I've mentioned here.

Cause you might want to sew a Union Jack to your bag or purse.
Or make a Simple Sunny Top for your little girl?
So many darling things to try!
And it's free, for anyone.
You just need to open an account on Craftsy and start searching.

So get going!
Visit Craftsy's FREE Pattern gallery HERE.
Enjoy!

This post is sponsored by Craftsy.
http://www.craftsy.com/patterns/sewing/free

Friday, October 31, 2014

Halloween 2014: Life in a Fishbowl


I asked Owen for a month what he wanted to be for Halloween.
R2D2?
Frodo?
A fisherman....something MineCraft......O-bot the Robot??
I was out of ideas.
Then finally on Saturday he looked at me with a straight face and gave his final answer----a Goldfish.

Okay!  Fun!
Do you want to be a bass fish, or a beta fish like you have in your room?
Nope. I want to be a goldfish.

You mean you want me to make a costume out of orange and yellow felt???
With circles and big eyeballs??
(happy sigh)
DONE!
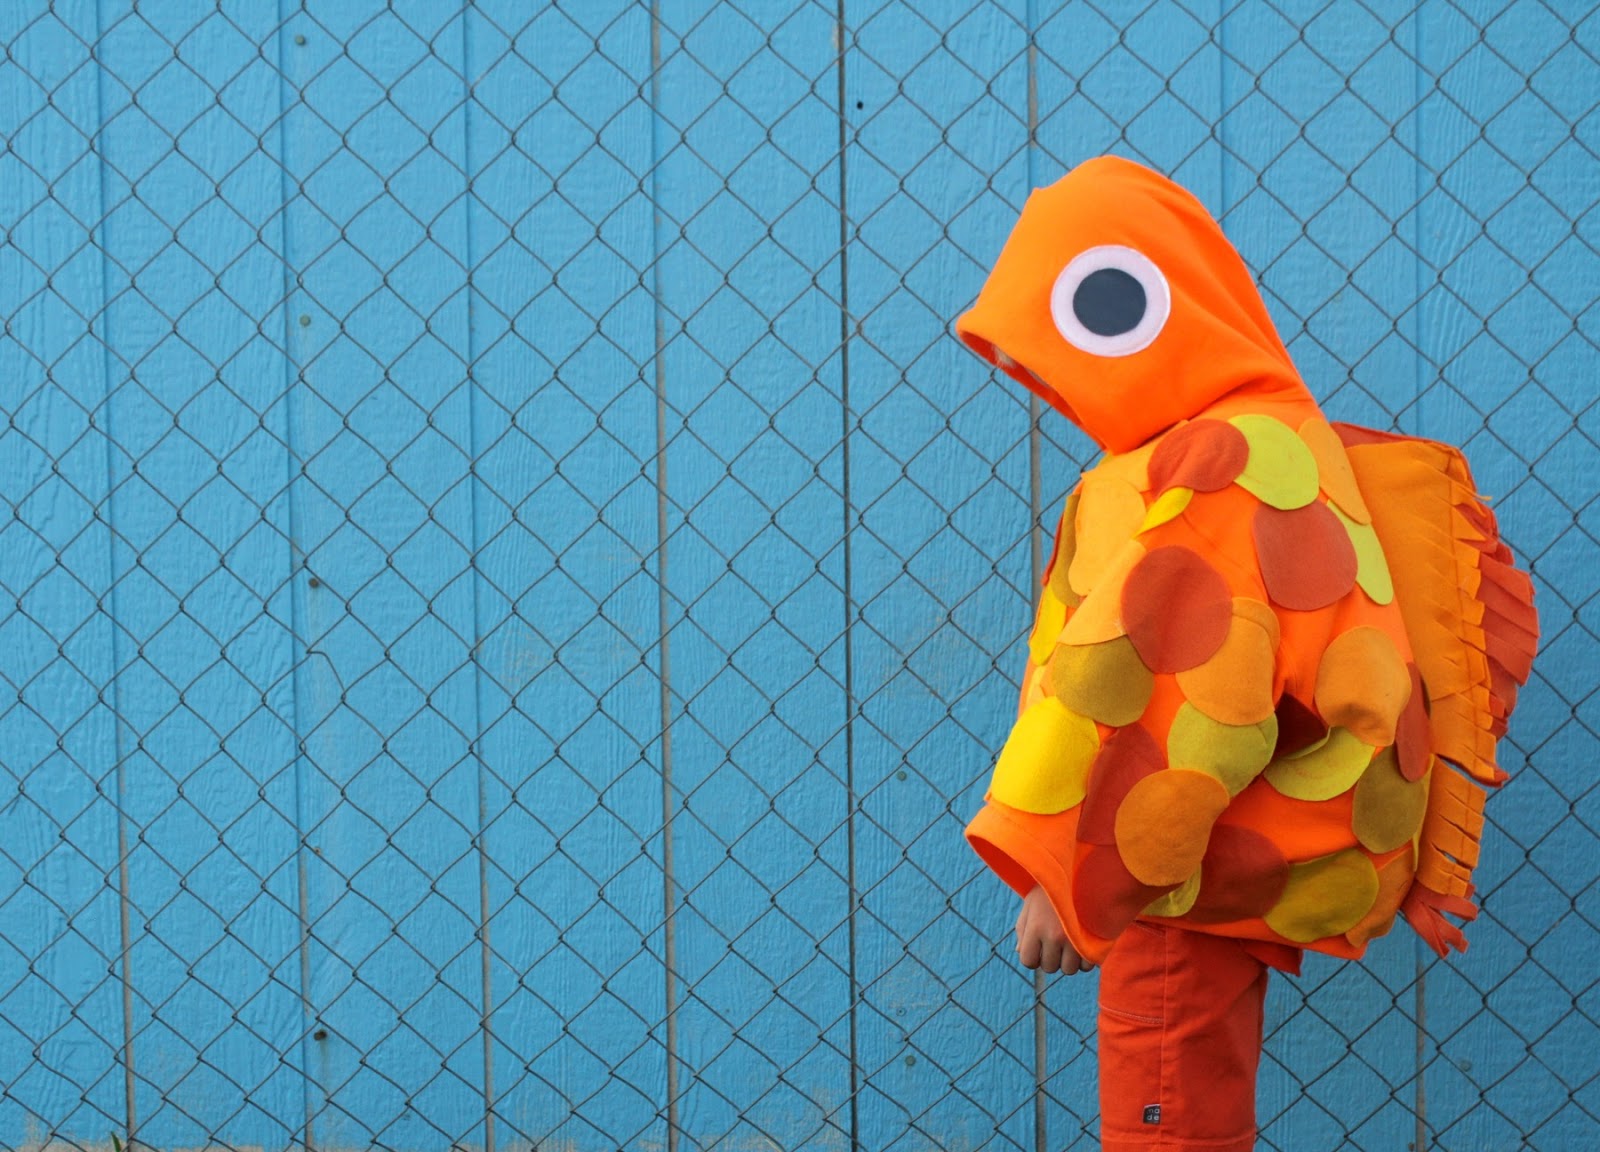
This costume was really fun and easy to put together.  And I'm so happy he thought of it---I like a creative challenge.  It sorta looks like a crossbreed of a fish and a bird.  But overall I think it works.

So if you've got your own big fish in a little pond,
Here's how to make a Goldfish Costume.....

1. HOODIE
In my mind I thought---I'll either make him a fish face hood out of felt OR  I'll find an orange hoodie and embellish the scales out of that thing.  Of course where are you going to find an orange sweatshirt 4 days before Halloween?  Um....apparently at Joanns!  Woohoo!  And for only $6. What??
Fishy fate.
Now, they only had adult size hoodies which I thought was a problem at first....but then it ended up being a huge help. Heh heh.  Huge.  Puffy?  Round fish?
Totally.
• Cut off the sleeves and hem them under, which actually works well because it makes the arms big and wide, sort of like fins.  And if you're making this as a bird costume, they can be wings!
• Cut off the bottom of the sweatshirt, remove the pocket, then sew the ribbing back on to the sweatshirt hem, just to make it a little shorter (and tighter)

2. SCALES
• Grab felt in a variety of orange/gold shades and trace/cut circles.  I cut out 3 circles at a time and it went pretty fast. 
• Arrange the circles on your sweatshirt to see how it looks---and the more random they are, the better.  I also left spaces here and there since most fish are missing a few scales. 
• Start at the bottom of the sweatshirt and at bottom of the sleeves and glue each scale to your sweatshirt with a hot glue gun. Then move your way up to the top of the sweatshirt and do the same thing on the back. I didn't do any scales on the hood.

3. FISH EYES
• Use a bowl or cup to trace eyeballs and pupils.
• Sew the black circle to the white.
• For added fun, cut a circle of clear vinyl and sew it on top of each eyeball, then sew the eyeballs to your hood.
I love love LOVE how the vinyl looks on the costume!  It's hard to see the full effect in these photos, but it adds that perfect touch.


4. FIN
Now this didn't execute as well as I'd hoped....looks kind of like feathers. But you could improve the process on yours.  I think it's the initial shape that was wrong---I should have angled it down more.  But here's what I did....
• Cut a few layers of felt and sew them down the middle back of the costume
• Fold the layers up and sew them together
• Fringe the edges


5.  ORANGE CLOTHES
Finish off the look with an orange T-shirt underneath and some orange shorts or pants.  Can you believe the mileage these KID Shorts have gotten over the last year??  I'll pretend I saw the goldfish future when I selected that orange fabric....
And finally....

6. FISH FILLING
To get a nice round goldfish, throw a bit of batting inside.
I took about 1 1/2 yards of quilt batting and just folded it up inside the costume, so it's like there's a blanket wrapped around his abdomen.  I didn't even attach it or glue it; it just kind of sits in there.   And if you live in a cold climate, it adds extra layers.
Of course if you live in a hot Texas climate.....you're sweatin' scales.  Good thing we've got those shorts on.
Oh little Owen, you make the cutest fish.
Thanks for the fun idea!....and for bringing this fish to life.
Every time I caught a glimpse of this on my cutting table, I saw a big dead fish.


"Owen are you a dead fish?"
"No. I'm just sleeping.  Fish sleep with their eyes open!"
(and their lips puckered)

Happy Halloween!