
So this year I was determined to make it happen.
We did!
And it even morphed from simply molding my kids hands to other beach-y objects....like this:
 to this!
 And we drove home to Texas with real beach momentos to decorate our house. I love how the glasses almost looked brushed in gold.
 It was all thanks to the special ingredient, Plaster of Paris:
 and the sand of course.
 I sort of remember using Plaster of Paris back in the day (probably for a Girl Scout project) but I couldn't remember quite how it worked.
Mix plaster and water?
Oh yea. Now I remember.
EASY.
You just need a mold to pour the wet plaster into. And damp beach sand makes the perfect spot, though you can also use your sandbox or even clay to create your mold.
 Now aside from the process being easy...I will say that it's also pretty messy (but hey you're at the beach). And we also lost a few finished products because some fingers broke off or the tide washed them away.
Exhibit A, Lucy's sad broken hand:
 So watch where you create your molds if the tide is coming in. And transport the finished items carefully.
Okay, here are the simple steps:
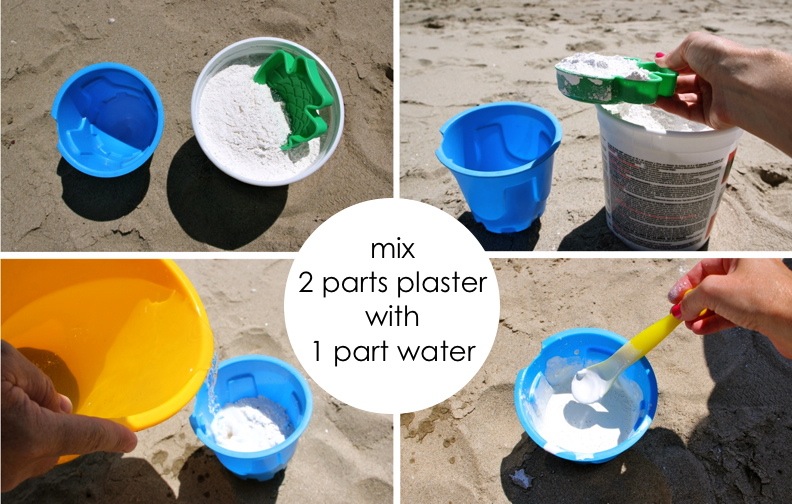 • You can buy Plaster of Paris at Michaels and other craft stores for about $7
• You don't need a proper measuring cup, just use whatever you have on hand...toys, drinking cups, etc.
• Saltwater from the ocean works just fine.
• Work in small batches till you find the proper consistency.
• You don't want the plaster to be too thin and milky or it will seep into the sand. However if it's too thick, it will dry faster than you can pour it. Mix it till it's like a milkshake.
Next....
 • You definitely need wet sand to create a mold but you don't want it so hard that a child won't be able to create a hand imprint. The best sand is right above where the tide breaks.
• Loosen up the sand a bit with you hands and smooth it out. Then help your child press their hand or foot or face?? into the sand and carefully pull it back up so the mold is as precise as possible.
• Work quickly to pour the plaster into the mold. Try not to leak any plaster outside of the mold.
When the mold has dried for only 5 or 10 minutes, use a feather or stick (whatever is around) to inscribe your child's name and the date on the back. You could make this an annual tradition, capturing your child's growing hand from year to year. The plaster molds make cool artwork for you home or beach house. Or give one to a Grandparent for Christmas. Make paper weights. Shadow box art? There are many possibilities.
 While the plaster dries, enjoy the other beach amenities.
 Then after about 30-40 mins, the plaster molds should be finished!
• Wash the molds off in the ocean and admire your amazing art.
• Place them in a safe place near your other belongings. You may want to bring a cookie sheet or pie pan with a towel inside to transport the finished molds. This will prevent them from getting stepped on and they can continue drying.
• When you're home, you can remove excess sand with an old toothbrush or cleaning brush. Just work carefully to avoiding breaking any plaster and don't brush off all the sand. That's the charm!
And there you go.
From glasses to beach art.
(btw, glasses are from Forever 21. $1.80 regular price. What tha what?)

Then find a cool place for your souvenirs, on or off the shelf.


No comments:
Post a Comment