Friday, October 31, 2014

Halloween 2014: Life in a Fishbowl


I asked Owen for a month what he wanted to be for Halloween.
R2D2?
Frodo?
A fisherman....something MineCraft......O-bot the Robot??
I was out of ideas.
Then finally on Saturday he looked at me with a straight face and gave his final answer----a Goldfish.

Okay!  Fun!
Do you want to be a bass fish, or a beta fish like you have in your room?
Nope. I want to be a goldfish.

You mean you want me to make a costume out of orange and yellow felt???
With circles and big eyeballs??
(happy sigh)
DONE!
This costume was really fun and easy to put together.  And I'm so happy he thought of it---I like a creative challenge.  It sorta looks like a crossbreed of a fish and a bird.  But overall I think it works.

So if you've got your own big fish in a little pond,
Here's how to make a Goldfish Costume.....
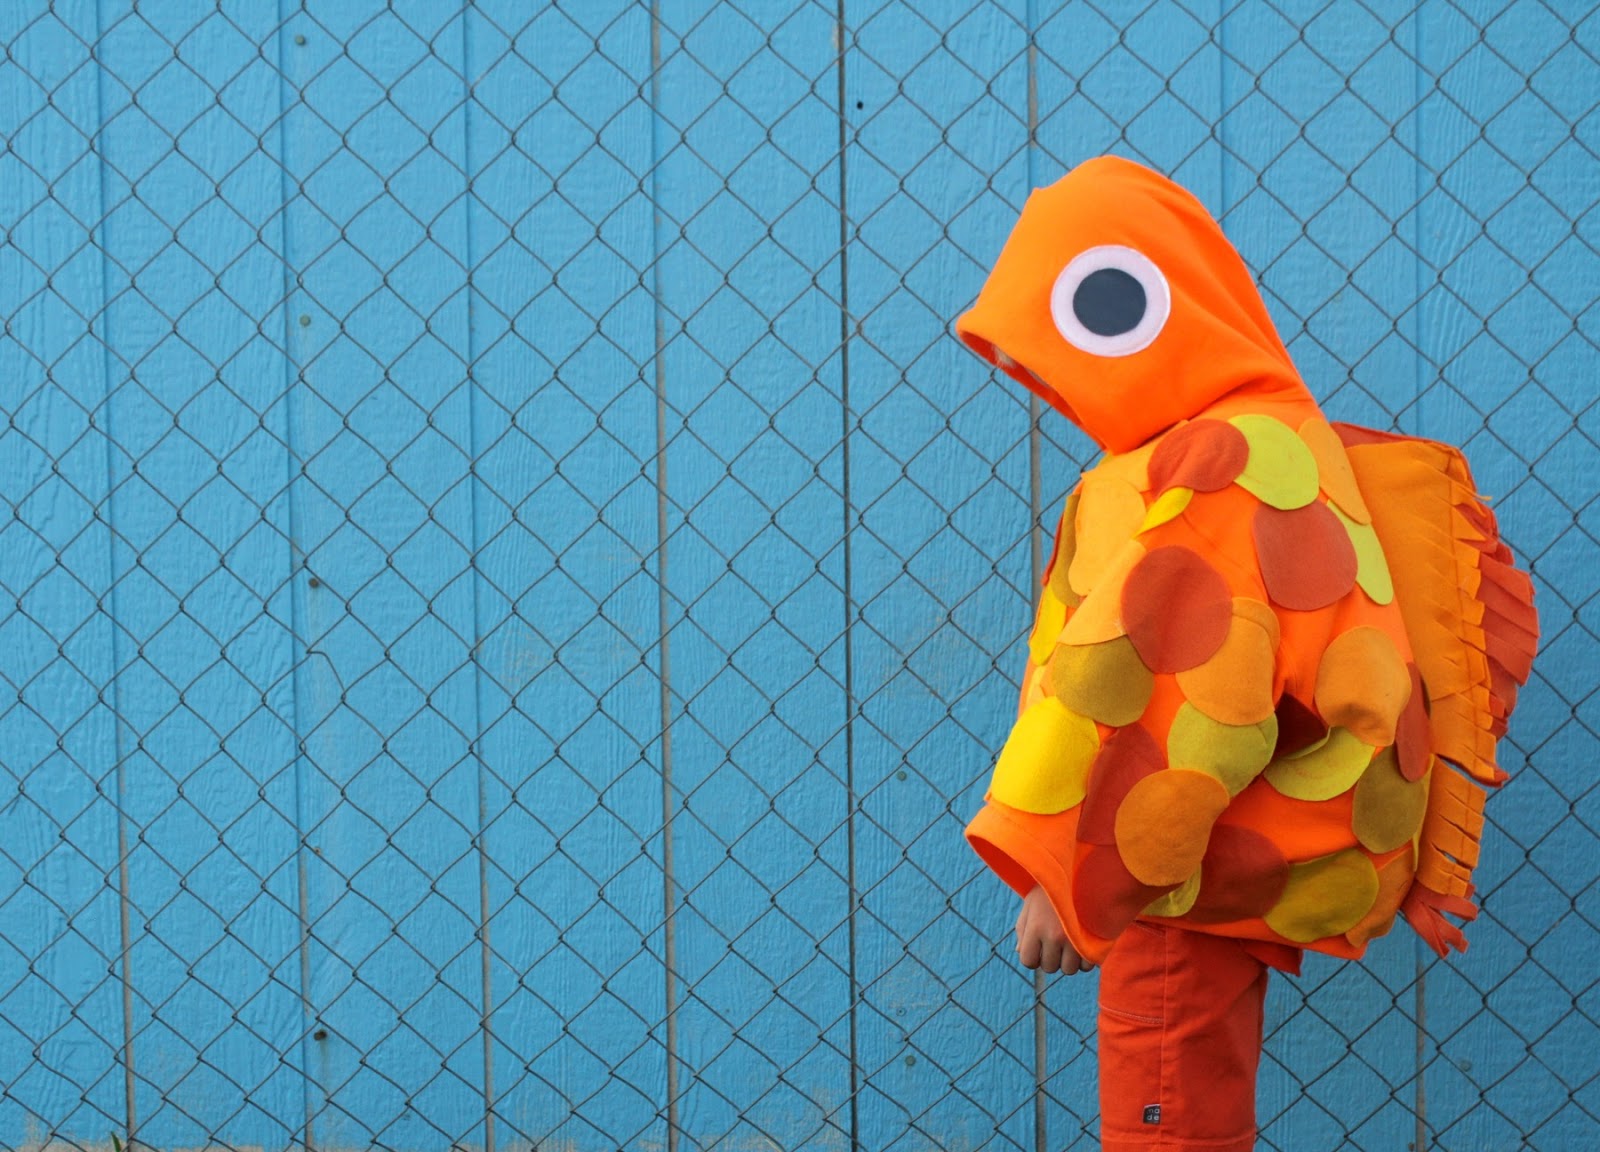
1. HOODIE
In my mind I thought---I'll either make him a fish face hood out of felt OR  I'll find an orange hoodie and embellish the scales out of that thing.  Of course where are you going to find an orange sweatshirt 4 days before Halloween?  Um....apparently at Joanns!  Woohoo!  And for only $6. What??
Fishy fate.
Now, they only had adult size hoodies which I thought was a problem at first....but then it ended up being a huge help. Heh heh.  Huge.  Puffy?  Round fish?
Totally.
• Cut off the sleeves and hem them under, which actually works well because it makes the arms big and wide, sort of like fins.  And if you're making this as a bird costume, they can be wings!
• Cut off the bottom of the sweatshirt, remove the pocket, then sew the ribbing back on to the sweatshirt hem, just to make it a little shorter (and tighter)

2. SCALES
• Grab felt in a variety of orange/gold shades and trace/cut circles.  I cut out 3 circles at a time and it went pretty fast. 
• Arrange the circles on your sweatshirt to see how it looks---and the more random they are, the better.  I also left spaces here and there since most fish are missing a few scales. 
• Start at the bottom of the sweatshirt and at bottom of the sleeves and glue each scale to your sweatshirt with a hot glue gun. Then move your way up to the top of the sweatshirt and do the same thing on the back. I didn't do any scales on the hood.

3. FISH EYES
• Use a bowl or cup to trace eyeballs and pupils.
• Sew the black circle to the white.
• For added fun, cut a circle of clear vinyl and sew it on top of each eyeball, then sew the eyeballs to your hood.
I love love LOVE how the vinyl looks on the costume!  It's hard to see the full effect in these photos, but it adds that perfect touch.


4. FIN
Now this didn't execute as well as I'd hoped....looks kind of like feathers. But you could improve the process on yours.  I think it's the initial shape that was wrong---I should have angled it down more.  But here's what I did....
• Cut a few layers of felt and sew them down the middle back of the costume
• Fold the layers up and sew them together
• Fringe the edges


5.  ORANGE CLOTHES
Finish off the look with an orange T-shirt underneath and some orange shorts or pants.  Can you believe the mileage these KID Shorts have gotten over the last year??  I'll pretend I saw the goldfish future when I selected that orange fabric....
And finally....

6. FISH FILLING
To get a nice round goldfish, throw a bit of batting inside.
I took about 1 1/2 yards of quilt batting and just folded it up inside the costume, so it's like there's a blanket wrapped around his abdomen.  I didn't even attach it or glue it; it just kind of sits in there.   And if you live in a cold climate, it adds extra layers.
Of course if you live in a hot Texas climate.....you're sweatin' scales.  Good thing we've got those shorts on.
Oh little Owen, you make the cutest fish.
Thanks for the fun idea!....and for bringing this fish to life.
Every time I caught a glimpse of this on my cutting table, I saw a big dead fish.


"Owen are you a dead fish?"
"No. I'm just sleeping.  Fish sleep with their eyes open!"
(and their lips puckered)

Happy Halloween!

Wednesday, October 29, 2014

I hate making cake pops

There I said it.
I'm sure I'll say it again.
In fact this is all very reminiscent of a clay Angry Birds post....
I guess that although I like to craft, and make, and do stuff, I just really hate uncontrolled messes.
And that's exactly how these feel!... until the bitter end,  when they do end up looking kind of cute.  And then it sort of seemed worth it.
Because I actually don't mind the cake baking, crumbling, rolling-ball steps.
That works out fine.
It's when we get to this blasted part of the process that I want to throw everything away!....

.....and treat my kids to a plastic container of those neon-colored sugar cookies at the grocery store instead (you know, those ones that your kids ask you to buy every season, because they come in a different color for every holiday?  That might have been easier.)
Sorry.
Don't mean to melt and complain on you.
Bear with me and we'll trudge through the bowls of hardened chocolate together.
I mean, Why?
Why did I use so many bowls?!
Dishes. For Days.

Okay. Here's the deal with the cake pops.
My mom got me the Bakerella Cake Pops book a few years ago.
It's adorable.
Maybe you remember the Rudolph pops I made for Owen's birthday a couple years ago?   With cake poop oozing out the back?
Anyway.
Owen loves looking through this book.  It's in my pantry and every once in a while he pulls it out and just studies all the pictures and schemes in his mind how he might make them.  It really is the cutest thing. 
And for the last month he's been flipping through the Halloween section and asking if we can make some (btw, I just noticed on the Bakerella site that she has an entire Halloween book out!....better not show that to Owen.  Heh Heh)

So in the midst of October craziness, I told him that the week after I finished shooting videos we would make some.
And then he did the cutest thing my amateur cake-pop heart had ever seen.
He drew me a picture of the steps for making jack-o-lantern cake pops.  Ahh! 
He even drew the pictures in a little mosaic, similar to her photos at the beginning of the book.  And he included a section for packaging and sending a pop off in the mailbox to a friend.  Oh Owen!
How could I say no to something like that?

So.  I baked two cakes.  I made the balls.
And when the kids came home we invited 5 friends over to help decorate the pops.
Bad idea.
Disaster!
Not because of the friends....but because of the delicate process (please share any tips you have for making it easier!)  The balls were falling apart in the chocolate, the chocolate wasn't melty enough, tic tacs were bounding on the floor, kids were running wild.
So we quickly made some disaster pops to appease the masses---covered with more sprinkles than chocolate---and most of the kids were happy.  Owen still wanted to make his special jack-o-lantern pop and was dying to try out the edible pen.
So the next day we gave it another go (after I had dipped the pops in a more controlled setting)
And here's what I concluded this time around:

• Work in small batches.
• Keep all of the balls in the fridge and move about 10 at a time to the freezer so they're only in for a short period of time.
• Melt the candy in small batches, and after you dip a few balls, melt it again.
• Plastic bowls work better than ceramic bowls.
• Dip the balls all the way under and use a spoon to smooth chocolate around the ball.
• Don't get hung-up on the word "smooth".  Most of us will never be Bakerella.  And if you are, please share tips!
• Do all the dipping at night, so you can be as neurotic as possible and let the kids help you decorate the next day.

Yay!
That's what we did.
And I gotta say, I love how they turned out.
We used a mix of edible pen drawings, frosting gel tubes, googly eyes (to make crazy eye balls):
and ghosts, and anything Halloween-y

And in the end, the kids were really proud of their creations.
Owen's favorite pop, was his jack-o-lantern, which looked pretty close to the ones in the book.
My worst pop was a clumpy ghost, too bottom heavy to stay on his stick.
Of course the other silver lining to the crazy mess, is that when you're done you have all sorts of treats to wrap up and share with friends, stuff in the kids lunches, send off in the mailbox as Owen illustrated (actually, that's probably a bad idea)
And if you have any leftovers, they make the perfect late night treat (they're yummy even with out the chocolate coating and whole lot easier to make!)

Ahhh. Okay.
My rant is done.
Till we meet again next month, cute little book....
I'm off to sew costumes!

Tuesday, October 21, 2014

Party Time! 2 projects that use your fabric scraps

Phew.
I made it through on the other side!
The other side of video week that is. 
We worked some long hours and shot 17 videos for Season 2 of MADE Everyday!....lots 'o stuff to share with you over the next 6 months.

But today I get to share the final video we shot from Season 1.
These are the perfect projects for all those fabric scraps you've been saving....you know, all those cute you little pieces you can't part with??
Well let's throw a party with them!

First we'll make a simple Fringe Garland, because you can never have too many garlands, right?
Then we'll use the scraps of our scraps to make cupcake toppers.
They're great for a party or to give as gifts to friends.


Just hit PLAY on the button below.
Enjoy!


MADE EVERYDAY with Dana is a fresh new sewing show, where we create fun things using everyday items.
To watch other episodes:
• Click the VIDEO tab at the top or….
• Subscribe to my Youtube channel so you’re updated as soon as the episode goes live.


Thursday, October 2, 2014

40 techniques every sewer should know

Remember last month when I wanted to become a master of zippers?
Well let's keep mastering!
...and talk about 40 techniques every sewer should know.
Because you know that old expression about how you don't know what you don't know, till you know?...ya know?  Well that's totally how I felt when I took this class! 
It's called 40 Techniques Every Sewer Should Know, taught by Gail Yellen, from the Craftsy site.  And it was filled with ah-ha moments, sewing realizations, and confirmations that I've been doing some of the tricky stuff "correctly" all along.  Yay!

Okay this class is really great.
Gail is a fantastic teacher, and her goal is to take sewer skills from "pretty good" up to "professional".  So no matter what your skill-level, there's something new to learn.

• In the interfacing section I love her tip for sewing knit t-shirts: use a strip of fusible interfacing in the shoulder seam to prevent it from over-stretching with time.  
• In the stitching section, Gail talks about specialty threads and goes over shirring with using elastic thread.
• In Curves + Corners she talks about clipping corners and mentions "don't be afraid to clip right up to the stitches" (carefully, of course). This is a great tip when sewing the back slit of the First Day Dress!


One of my favorite parts is where Gail talks about the importance of cutting bias tape ON the bias, rather than cut on the straight grain.  Great visual with these two circles!

And....there's even an entire section on pressing....PRESSING!  I had no idea what details I was missing out on!

I fully agree with her statement that "an iron is equally as important as a sewing machine"  Yes! Yes!  Pressing is key to making your work look less homemade and more like a pro.

There are  You're able to ask questions and interact with other students online.  And you can access the class forever!  FANTASTIC.  It's so helpful to go back and watch segments as a refresher.


Okay, more of what you'll get from 40 Techniques Every Sewer Should know:
• 8 lessons, each taught in HD video format.
• You can ask questions and interact with other students online
• Access to the class forever!
• Learn to sew a perfect sleeve
• Work with interfacing
• Create beautiful bindings
• Learn tips for tricky sewing techniques
....and a whole lot more.


If you've never taken a Craftsy course, they're real easy to access and navigate through.
Some classes are free; some are paid.
And today we're giving away 40 Techniques Every Sewer Should know for free!

It's easy to enter,
All you need to do is visit Craftsy through this link and join the site!
(the link is unique to my site, so they'll know you joined through MADE)

If you’re already a Craftsy member, all you have to do is visit the link, click the “sign in” button, and sign in with your Craftsy account. If you’re already logged in to Craftsy, be sure to log out before clicking the link or you won’t see the special sign up/log in screen.
Craftsy will pick one winner from all the entries.


Click here to enter to win!
Note: Leaving a comment here on this post does not enter you in the class giveaway.  Of course I love your comments though, so please feel free to leave one!

This post is sponsored by Craftsy