
If you haven't watched yet....SPOILER ALERT.....go watch and then come back.  The designers had to create a look for a toddler (an 18 month old). And when I saw the previews I thought, finally! Project Runway Kids. It's something I've always dreamed of. But they totally botched it up. The winning look was the only one I liked (actually I loved that little sweat suit) but I hated the rest.
 Now, just a disclaimer before I go around offending people on my personal style opinions. I assume some of you stop by here because you appreciate my style and design. It's something you relate to and you like or you'd like to incorporate similar ideas into your own fashion. You know I love making kids' clothes. And simple/minimal is my favorite. If you're a more "gussy it up" kind of gal I really don't mean to hurt any feelings...just want to talk about kids clothes from my perspective.
 So...the designers had to create a look for Heidi Klum's new kids line for Babies 'R Us called Truly Scrumptious.....which is, eh. Not my style at all. Too messy, too many do-dads and embellishments, too many character faces, too, too, too. I'm just a simple girl! Give me solids, stripes, dots, and we're good.
Now I know not everyone is like that. But the advice Heidi gave the designers made me cringe! They were making some cute/decent things in the work room. But then Heidi turned up her nose at them saying things like, a mom wants to feel like she's getting her money's worth out of a design, so amp it up. What? Good design doesn't mean splatter it with fabric flowers....or embellish a sequins monster face on the back just so someone feels like they're getting a good trade. Again, all my opinion. But I could tell the designers weren't going with their gut instincts because Heidi lead them to think that all moms want gooey stuff. Ugh. No gracias.
So...the designers had to create a look for Heidi Klum's new kids line for Babies 'R Us called Truly Scrumptious.....which is, eh. Not my style at all. Too messy, too many do-dads and embellishments, too many character faces, too, too, too. I'm just a simple girl! Give me solids, stripes, dots, and we're good.
Now I know not everyone is like that. But the advice Heidi gave the designers made me cringe! They were making some cute/decent things in the work room. But then Heidi turned up her nose at them saying things like, a mom wants to feel like she's getting her money's worth out of a design, so amp it up. What? Good design doesn't mean splatter it with fabric flowers....or embellish a sequins monster face on the back just so someone feels like they're getting a good trade. Again, all my opinion. But I could tell the designers weren't going with their gut instincts because Heidi lead them to think that all moms want gooey stuff. Ugh. No gracias. As the judges critqued, I felt like the one person in the room who couldn't see the emperor's clothes.
Chris's flowery dress looked very Ross or TJ Maxx (not that that's bad. I shop there! The dress just looked cheap and way overdone for my taste). Elena's jacket was actually cute but she ruined it with a bunch of embroidery flowers on the back. Dimitri's kid looked like Super Mario. Melissa's vest was cute till she monsterized it (and I'm not anti monsters. They can be done in a cute way). Fabio's look was so-so. And Sanjia's suit was the clear winner (though these runway photos don't show it off very well).
As the judges critqued, I felt like the one person in the room who couldn't see the emperor's clothes.
Chris's flowery dress looked very Ross or TJ Maxx (not that that's bad. I shop there! The dress just looked cheap and way overdone for my taste). Elena's jacket was actually cute but she ruined it with a bunch of embroidery flowers on the back. Dimitri's kid looked like Super Mario. Melissa's vest was cute till she monsterized it (and I'm not anti monsters. They can be done in a cute way). Fabio's look was so-so. And Sanjia's suit was the clear winner (though these runway photos don't show it off very well).
 But the icing on the episode was Heidi's idea to give all the designers fake babies....those dolls that cry every so often till you give them a fake bottle, or hold them, etc. You know, like real babies. Haah. It was SO obnoxious. As a mom who lives that life, I couldn't stand the constant crying in the work room. This was my evening to escape from kids!
 I also have no idea how it was helping the designers to understand children's clothing. They weren't designing for infants. It was a pure nuisance. Though the best line of the night came from Christopher, "Now I know why Judy went off the deep end with Liza."
Life is better somewhere over the rainbow, indeed.
But back to clothes....Man, I sound so crtical. I guess I am.
I just love kids clothes and they made some really lame stuff.And when I look at the stuff you guys make and the stuff in the Kids Clothes Week Challenge flickr group, I'm wowed and inspired! (more on KCWC here).
I also have no idea how it was helping the designers to understand children's clothing. They weren't designing for infants. It was a pure nuisance. Though the best line of the night came from Christopher, "Now I know why Judy went off the deep end with Liza."
Life is better somewhere over the rainbow, indeed.
But back to clothes....Man, I sound so crtical. I guess I am.
I just love kids clothes and they made some really lame stuff.And when I look at the stuff you guys make and the stuff in the Kids Clothes Week Challenge flickr group, I'm wowed and inspired! (more on KCWC here). And when I look at what the ladies are doing online at Project Run and Play (a weekly competition) I'm impressed again! From the current season and past, they're churning out amazing stuff like this....(above photos by ISLY, A Little Gray, Lindsay Etc, and Skirt as Top)I'm pretty much in love with anything Danielle from My Sparkle makes. I'll take one of each please.
 The same goes for darling stuff from Delia Creates (current season):
 And cool boy looks from Running with Scissors, Elegance and Elephants, and The Train to Crazy
 Now compare those to the real Project Runway photos above?
These blogging ladies are stealing the show.
I'm done ranting.
What did you think?
Now compare those to the real Project Runway photos above?
These blogging ladies are stealing the show.
I'm done ranting.
What did you think?
 The designers had to create a look for a toddler (an 18 month old). And when I saw the previews I thought, finally! Project Runway Kids. It's something I've always dreamed of. But they totally botched it up. The winning look was the only one I liked (actually I loved that little sweat suit) but I hated the rest.
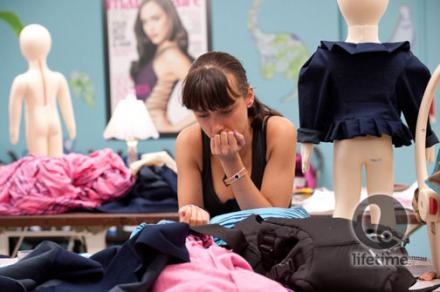 Now, just a disclaimer before I go around offending people on my personal style opinions. I assume some of you stop by here because you appreciate my style and design. It's something you relate to and you like or you'd like to incorporate similar ideas into your own fashion. You know I love making kids' clothes. And simple/minimal is my favorite. If you're a more "gussy it up" kind of gal I really don't mean to hurt any feelings...just want to talk about kids clothes from my perspective.
 So...the designers had to create a look for Heidi Klum's new kids line for Babies 'R Us called Truly Scrumptious.....which is, eh. Not my style at all. Too messy, too many do-dads and embellishments, too many character faces, too, too, too. I'm just a simple girl! Give me solids, stripes, dots, and we're good.
Now I know not everyone is like that. But the advice Heidi gave the designers made me cringe! They were making some cute/decent things in the work room. But then Heidi turned up her nose at them saying things like, a mom wants to feel like she's getting her money's worth out of a design, so amp it up. What? Good design doesn't mean splatter it with fabric flowers....or embellish a sequins monster face on the back just so someone feels like they're getting a good trade. Again, all my opinion. But I could tell the designers weren't going with their gut instincts because Heidi lead them to think that all moms want gooey stuff. Ugh. No gracias.
So...the designers had to create a look for Heidi Klum's new kids line for Babies 'R Us called Truly Scrumptious.....which is, eh. Not my style at all. Too messy, too many do-dads and embellishments, too many character faces, too, too, too. I'm just a simple girl! Give me solids, stripes, dots, and we're good.
Now I know not everyone is like that. But the advice Heidi gave the designers made me cringe! They were making some cute/decent things in the work room. But then Heidi turned up her nose at them saying things like, a mom wants to feel like she's getting her money's worth out of a design, so amp it up. What? Good design doesn't mean splatter it with fabric flowers....or embellish a sequins monster face on the back just so someone feels like they're getting a good trade. Again, all my opinion. But I could tell the designers weren't going with their gut instincts because Heidi lead them to think that all moms want gooey stuff. Ugh. No gracias. As the judges critqued, I felt like the one person in the room who couldn't see the emperor's clothes.
Chris's flowery dress looked very Ross or TJ Maxx (not that that's bad. I shop there! The dress just looked cheap and way overdone for my taste). Elena's jacket was actually cute but she ruined it with a bunch of embroidery flowers on the back. Dimitri's kid looked like Super Mario. Melissa's vest was cute till she monsterized it (and I'm not anti monsters. They can be done in a cute way). Fabio's look was so-so. And Sanjia's suit was the clear winner (though these runway photos don't show it off very well).
But the icing on the episode was Heidi's idea to give all the designers fake babies....those dolls that cry every so often till you give them a fake bottle, or hold them, etc. You know, like real babies. Haah. It was SO obnoxious. As a mom who lives that life, I couldn't stand the constant crying in the work room. This was my evening to escape from kids!
As the judges critqued, I felt like the one person in the room who couldn't see the emperor's clothes.
Chris's flowery dress looked very Ross or TJ Maxx (not that that's bad. I shop there! The dress just looked cheap and way overdone for my taste). Elena's jacket was actually cute but she ruined it with a bunch of embroidery flowers on the back. Dimitri's kid looked like Super Mario. Melissa's vest was cute till she monsterized it (and I'm not anti monsters. They can be done in a cute way). Fabio's look was so-so. And Sanjia's suit was the clear winner (though these runway photos don't show it off very well).
But the icing on the episode was Heidi's idea to give all the designers fake babies....those dolls that cry every so often till you give them a fake bottle, or hold them, etc. You know, like real babies. Haah. It was SO obnoxious. As a mom who lives that life, I couldn't stand the constant crying in the work room. This was my evening to escape from kids! I also have no idea how it was helping the designers to understand children's clothing. They weren't designing for infants. It was a pure nuisance. Though the best line of the night came from Christopher, "Now I know why Judy went off the deep end with Liza."
Life is better somewhere over the rainbow, indeed.
But back to clothes....Man, I sound so crtical. I guess I am.
I just love kids clothes and they made some really lame stuff.And when I look at the stuff you guys make and the stuff in the Kids Clothes Week Challenge flickr group, I'm wowed and inspired! (more on KCWC here).
I also have no idea how it was helping the designers to understand children's clothing. They weren't designing for infants. It was a pure nuisance. Though the best line of the night came from Christopher, "Now I know why Judy went off the deep end with Liza."
Life is better somewhere over the rainbow, indeed.
But back to clothes....Man, I sound so crtical. I guess I am.
I just love kids clothes and they made some really lame stuff.And when I look at the stuff you guys make and the stuff in the Kids Clothes Week Challenge flickr group, I'm wowed and inspired! (more on KCWC here). And when I look at what the ladies are doing online at Project Run and Play (a weekly competition) I'm impressed again! From the current season and past, they're churning out amazing stuff like this....(above photos by ISLY, A Little Gray, Lindsay Etc, and Skirt as Top)I'm pretty much in love with anything Danielle from My Sparkle makes. I'll take one of each please.
 The same goes for darling stuff from Delia Creates (current season):
 And cool boy looks from Running with Scissors, Elegance and Elephants, and The Train to Crazy
 Now compare those to the real Project Runway photos above?
These blogging ladies are stealing the show.
I'm done ranting.
What did you think?
Now compare those to the real Project Runway photos above?
These blogging ladies are stealing the show.
I'm done ranting.
What did you think?


