Wednesday, October 31, 2012

Halloween 2012, version 2: Once upon a Dream...

When Lucy said she wanted to be a princess, I was bummed.
Rapunzel, Belle, Ariel?  You can pull those out of the dress-up box any day and give em a whirl.
(boring).

So we tried to brainstorm other ideas but she kept coming back to the princess.
(at what age do they move beyond the Disney obsession?)
Then we found out that her good friends were dressing up as the three fairies from Sleeping Beauty (adorable!)  Hmmmm, I thought.....I suppose Lucy could be Sleeping Beauty and Owen could be Prince Phillip?  Clara could be Maleficent?  (Haah.  Owen nixed that one pretty quickly).

But I was warming up to the Sleeping Beauty idea.  Perhaps I could make a dress that we both liked; something couture to her body and more fancy than the cheap store-bought version we already had.
The only question was....do you make it pink or blue?
What if she could have both?
Yes!  I used that great scene from the movie as my inspiration.  "It's blue!  It's pink!  BLUE.  Pink!"  (photo source).
 And we came up with:
 Pink from one side, blue from the other. 
And ready to dance into the clouds with her prince.
If only life were that simple.
In some ways I suppose it is.  Lucy. Was. THRILLED with the dress.
Another happy moment for us all!
She felt like royalty and walked around the house talking to everyone as such.  And then we had a talk about treating your "servants" kindly, even if you're the queen.
So.  For the dress.....
• I actually did a quick sketch before starting just to make sure I wasn't crazy.  It'll look okay, right?  Lucy said yes.  Moving onward...
• I filled my shopping cart with every fabric I swore I'd never use again after last year's Halloween costumes (and the year before, and the year before): satin, chiffon, and taffeta.   The taffeta, however, was awesome and I highly recommend (btw, you can read more about all these fabrics in my book!  wink wink).  Taffeta is stiffer than satin but still drapes beautifully and doesn't slip underneath itself as you sew.
• I created my own pattern by tracing the width of a T-shirt, then created a boatneck-ish neckline without it falling off her shoulders (wanted to keep it age-appropriate), and added additional room for seams down the middle front and back. 
• I also sewed two test-bodices (which I don't normally do) just to make sure I was on track and didn't waste the fancy fabric.
• I added a zipper in the back so the dress could be fitted to her body and a lining so the taffeta seams wouldn't scratch.  I know a lining sounds fancy but I honestly think it's easier to do that, than dealing with all the exposed seams.
• The collar is two layers of satin lined with interfacing, sewn right in-between the dress and lining layers.

• I intended for the bottom to be a circle skirt but I didn't have enough fabric for a full circle.  So instead, I created a partial circle from 6 pieces.  I measured the distance around the bodice waist and divided it up into 6 (accounting for seam allowances), then cut triangular type pieces and sewed them all together.  When I was almost finished with the dress, I trimmed the bottom to a circular shape for the hem, making it slightly longer in the back for a mini "train" look.
• The center piece was the biggest beast and I'm sure I went about it the hard way.  But I created a double-layered mini version of the large skirt, sewed zigzags into it, turned it right-side out and basted it to the skirt before sewing the dress all together.  It sounds easy saying that but the math drove me insane.  I was overjoyed when it worked out.
It was a lengthy project but the finished product made it worth it!  And with every thread change (which was often) I felt like fairies were barking over my shoulder.
Lucy patiently waited as I sewed, checking in every so often, and drawing her own version of the dress next to mine.
She helped me make a crown from spray-painted cardstock and hand-drawn ideas.
And it fit!

 Then our little pink/blue princess was ready....waltzing and twirling around the room all afternoon.
I'm so happy when my kids love something I can make for them.
It's the best!

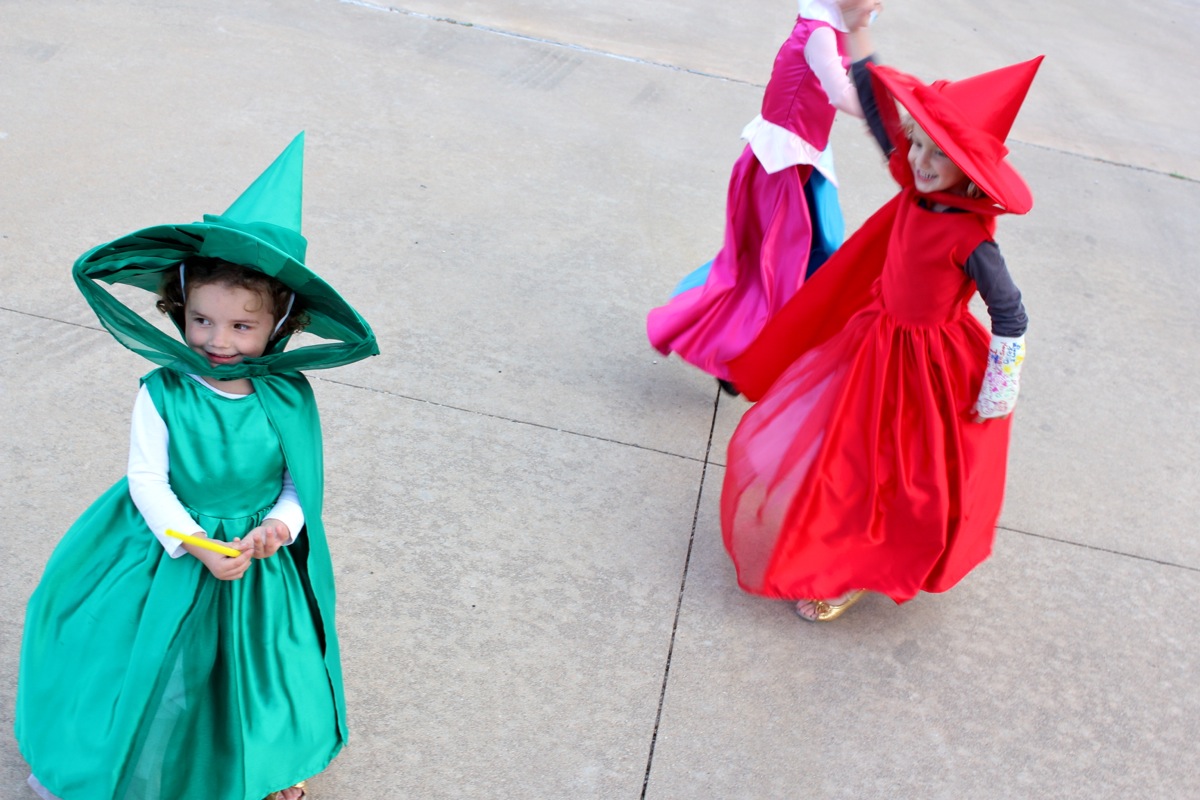
Eventually on Saturday night, we ran into Fauna and Flora....
....who continued to cast spells on her enchanted gown (baby Merryweather was asleep in her mom's arms).
And that my friends, is a happily ever after Halloween for you. 
No satin next year.
Maybe.

Tuesday, October 30, 2012

Halloween 2012: channeling The Force


Owen is obsessed with Star Wars.
Like OB-sessed, which is funny because he's only 4 and it's not like Casey is wearing droid costumes to Comic Con (I think).
But.  Well.
It started when he caught us watching the Family Guy version of Star Wars and must have thought, Oh Darth Vader is a cute little baby who speaks British.  Then he saw C-3PO and Chewy, and well....it was over.  He wanted to know everything. So now he's seen the older 3 movies, loves all the Lego star wars stuff, and pretty much turns anything he sees into a Star Wars moment.  We see a red light of some sort?  It's Darth Vader.  There's an open field with a small hole in the middle?  It's the Sarlac, etc. etc.

Lately he's been into the character Mace Windu, which is actually from the newer movies which he doesn't like as much and barely understands.  I think what he really loves is that Mace has a purple light saber.
Ooooo.
So when it came time for Halloween costumes, all he wanted to be was Mace Windu.
And....I caved.
No more ensemble costumes for the kiddos, for now at least.

So I give you, Mace Owen-du.
(too much?
yea. too much)
 He's got the same sweet moves as Samuel L.
 And he's added in a few of his own.
Seriously, seeing him put that costume on the first time was the cutest thing.  He LOVED it.  He was kind of giddy. 
And when I brought out the purple light saber that he'd seen at Target for months, it was Christmas morning.  Those are the payoffs of making costumes for kids, right?  Knowing they are loving something you made, especially for them.  Win-win.
He took the sabering pretty seriously.
So.  Need to make a Jedi costume?
Or Lord of the The Rings getup?  Or Harry Potter robe?  Dungeons and Dragons? (they're all kind of the same right?).   Here's an easy solution, using some of the tutorials and patterns from my site:
PANTS:  These were the easiest.  You can make your own of course, using the Kid Pants tutorial and pattern HERE (just taper the legs to make them "skinny").  But I bought a pair of cheap khakis from Target for $4 and sewed right down the sides of the legs to make them skinny.  In the real Jedi photos, they're wearing leggings.  But cream colored leggings on my boy?  I thought pants were a better option.
MUSLIN VEST:  The real characters have fancy long-sleeved kimono type things.  I went with a vest because it's easy and it's hot here in Texas.  So, I used the Frontier Vest Pattern and made a few tweaks (I was sort of winging it as I went). I used a simple nubby muslin (about $3/yard from Hobby Lobby) and cut the front and back pieces into more of an "A" shape on the sides so it would overlap well in the front. I serged all the raw edges and ironed them under/sewed.  If you don't have a serger, just fold the edges under and sew.  It's just a costume.  But when I was finished sewing the vest was too flat.  So I took out the shoulder seams and cut a punch of strips of fabric, ironed the edges of the strips under, and sewed them randomly to the front of the vest.  This made it look like the vest was folded and pleated on front.  Totally worked.  Then I sewed the shoulders seams back together.
ROBE:  This is the piece that really completes the outfit.  I used the Beach Robe Pattern and decided to add a satin lining to make it extra special (the outside fabric is a faux-suede knit).  I extended the length on all the pattern pieces, sewed both robes separately, then pinned/sewed them together around the outer seams and hood, leaving an opening at the bottom hem so I could turn the whole thing right-side out.  (note: keep the sleeves out as well, don't sew those together till the very end).  Then I turned it out, tucked the lining inside, ironed the bottom hem and sleeve hems under and sewed the openings closed. Done!
 Oh and one final touch is that I added a small piece of looped elastic to the collar when sewing both robes together and placed a button on the other side to help the robe stay on (similar to reversible hooded capes)
THE REST: All you need now is a pair of boots (ours are from Walmart, last winter, $10), a T-shirt, and a belt. I used scrap pieces of fabric from the robe and tied it like a sash around his waist.
And of course, don't forget the light saber.  You can do the real thing or the Noodle method:
One Jedi master, in training.
 May the force be with you.

Friday, October 26, 2012

8 months old

Well. Little Clara is not so little any more. 8 months old! And showing more personality every day.
I love when a baby starts to "tease" and and be playful.   And since she's the most ticklish baby I've had, we all love making her laugh.

She's still such a pleasant baby....wiggly and all over the place but totally happy as she's doing it.  She's a champ at sitting up.  Sometimes I even hear her at 4am, just sitting and smiling in her crib, which we've gotta do something about that (the 4am thing, not the happy)
She's soooo close to crawling.  She's perfected the army crawl, dragging herself around the living room.  And she can sit and scoot, sit and scoot.  So one of these days it'll all click.
Probably the biggest milestone this month is that she EATS!
I first introduced baby food when she was six months old and it was a disaster.  She wasn't ready, I am never ready (I hate teaching babies to eat), and so we took a two month break.  And that made all the difference.  Now she gobbles it on up!
If it doesn't get all over the place, it doesn't belong in your face?  Uh. Maybe.
She still has the fabulous old man combover but the back is really filling in.  In a few months it might look more normal.
And guess what??  TWO teeth!
I love this look!  Especially when Clara gives a signature silly stare. 
Okay here's the 8 month comparison:
Have a great weekend!