Friday, December 9, 2011

Happy Holidays everyone! I 'm Lorajean from Lorajean’s Magazine. I am so excited to share one of my favorite holiday cookie recipes; Chocolate-Dipped Orange Logs! I love eating fruit in its season, It makes our Christmas time that much more special because this is the only time of year we buy oranges! :) These cookies use the peels to give them a tasty orange flavor. I don't know why it is but chocolate and orange always go together so well, and the end result is such a yummy mouth watering cookie that you will want to eat three batches! (OK maybe that's just me.)

The recipe is fairly simple, the cookie making part goes pretty fast and kind-of makes up for the time it takes to dip each one in chocolate. Another thing I love about this recipe is you can prepare and refrigerate the dough a day or two a head of time.

Chocolate Dipped Orange Logs

Ingredients:

  1. 3 ¼ cups all purpose flour
  2. ⅓ teaspoon salt
  3. 1 cup real butter, softened (none of that fake margarine stuff)
  4. 1 cup sugar
  5. 2 eggs
  6. 3 teaspoons freshly grated orange peel ( I say fresh because once I tried to refrigerate some orange peel over night and it dried up and didn’t work at all)
  7. 1 teaspoon vanilla
  8. 1 package of semi sweet chocolate chips

Directions:

  1. Preheat oven to 350 degrees Fahrenheit
  2. Combine flour and salt then set aside
  3. In separate bowl cream butter and sugar with an electric mixer, beat till fluffy
  4. Beat in eggs one at a time
  5. Beat in orange peel and vanilla
  6. Stir in flour and salt mixture
  7. Roll dough into 1in. balls
  8. Roll balls into log shapes and place 1in. apart on greased cookie sheets
  9. Bake for 16-18 min (till bottoms are golden brown)
  10. Cool cookies on wire rack (cookies should harden as they cool)
  11. Melt chocolate and dip each cookie in half way
  12. Place dipped cookies on a cookie sheet lined with wax paper
  13. Let chocolate cool and harden. ( If you are impatient like me you can put them in the freezer for a few minuets to set the chocolate faster.)
  14. Makes about 36 cookies

There you have it! A wonderfully delicious cookie you'll want to share with your friends and neighbors! I am making theses cookies today to give out as we go caroling.

And because I can’t share treats without cute packaging, I am making origami boxes with windows to handout the cookies in. You can see my tutorial on how to make origami boxes here on my blog, and learn how to add a window in it here.

I am so grateful to be here on Dana's blog today celebrating Christmas and the yummy cookies we bake to make it a little sweeter. Thanks for having me!

Monday, December 5, 2011

My friend Eva used to bring this to our book club get-togethers and I thought it was amazing. Then she told me there were only 2 ingredients. And I thought it was even more amazing. And to top it off, the cute pink twist was nothing more than food coloring! You know, just for fun.
I like fun.
Now it's my favorite go-to dip for parties.
It's just so easy! And with a piece of tart fruit tastes creamy good.
Marshmallow Creme Dip
(1) 8oz block of cream cheese (room temperature)
(1) 7oz bottle of Marshmallow Creme (sorry if it's not carried in your area. I'm not sure what to substitute)

Mix them together with an electric mixer for about a minute.
Then pick your flavor or color.
If you want to try both, split the recipe into two bowls and add one of each:
* 1 Tablespoon of Cocoa powder (add more if you like a richer chocolate but too much or the dip will be too thick)
* Dab of food coloring. I used Wilton's burgundy color.
Two yummy dips!
Then select and cut your favorite fruits.
Arrange them on your favorite plate.
And eat-it-all.
Yummy.
Granny smith apples and strawberries with pink dip were my favorites.

Saturday, December 3, 2011

Sticking with last-minute Handmade gift ideas, here's another one for you--Nutella play dough. Intriguing right? It's from adorable Brazilian blogger Damaris and her site Kitchen Corners. This recipe is not something you actually eat. But it does smell divine and makes the perfect little Christmas gift to hand out.
So from her warm Brazilian weather to your chilly home, here's something to try....
Hi there, I'm Damaris from Kitchen Corners.
At our home in Brazil we play with homemade play dough a lot. In fact we use our cookies cutters more with play dough than with actual cookies. So today I made Nutella play dough because if I was on my death bed and had one one last breath to take in I would hope that someone would put a jar of Nutella up to my nose. It's that good.

I've made chocolate play dough before but other than looking brown it doesn't smell like chocolate, so really what's the point? Nutella on the other hand did not disappoint. This play dough smells like Nutella but tastes like nasty salty play dough, of course. So please make this for a child that knows the difference between play dough and chocolate cookie dough. All the ingredients are technically edible but I would still recommend giving it to an older child.

Place the play dough in a glass jar, decorate it with a ribbon, and you have a simple last-minute gift. If you're fortunate to live by an Ikea I would get the toy baking set that comes with a rolling pin, cookie cutters, and some baking pans. It's one of my son's favorite toys. He actually uses the rolling pin a lot when he makes pizza and we've put the toy cookie sheet in the oven many times and it works just fine. This is why every time I drive by Ikea I make sure to blow them kisses.

Anyway, what do you think? Nutella play dough with a toy baking set? Know any kids who would enjoy this?
Here's the recipe.

Nutella Play Dough
(printable version)
  • 2 cups flour
  • 1/2 cup of powdered cocoa
  • 1/2 cup salt
  • 1/2 tablespoon cream of tartar
  • 1 1/2 tablespoons nutella
  • 1/2 tablespoon vegetable oil
  • 1 cup water
  1. Boil the water in a small sauce pan.
  2. In a medium sized pan mix the flour, cocoa powder, salt and cream of tartar.
  3. Add the boiling water, oil, and nutella to the mix and stir on medium-low heat until it is thick.
  4. Cool completly before kneading the dough.
  5. Knead the dough on a floured surface until it no longer sticks to your hands.
--------------------------------------------------------------
Thanks Damaris! I love really simple, cute gifts for kids. Cause when you've got a lot of nieces and nephews it's nice to have an idea you can whip up in batches. And they'd make perfect stocking stuffers! (so much better than the hot pink stuff I bought last week). I can smell the Nutella now....
Mmmm.
Have a warm Merry Christmas in the southern hemisphere!
Check out the Sweets and Treats archive page HERE.

Wednesday, November 16, 2011

School Bus and I love Planes!--Transportation Tote

Hello friends! I'm Dana from MADE and I'm really happy to be part of Once Upon a Thread again. I actually emailed Katy a few months ago to make sure she was doing it since I love being inspired by the artwork and words in children's books.

And today I was motivated by 2 books about planes, trains, and automobiles.

My 4-year old son Owen is a boy like most others--obsessed with cars, trucks, planes, boats, and all means of transportation. How do they learn these things? It's somehow in their DNA to pick up a play car and make crazy driving noises.
Recently we checked out two books from the library that I knew he'd enjoy:
I love Planes! by Philemon Sturges
School Bus by Donald Crews
He did love them. And I loved them too!--especially the School Bus artwork. I almost didn't care what the words said; I just wanted to look at the pictures.
And since I've been on a school-bag sewing kick (making themed bags for my daughter's kindergarten teacher) I used planes, cars, and wheels as my inspiration for the next school bag....
Other themed bags I've made are Rainy Day, Tooth Fairy, and Cookie Jar. I gave this one a small twist and turned it into a simple backpack, decorating it my favorite felt of course. The words are hand-written with sharpie marker on Cotton fabric.
And the exhaust is a small bit of batting glued to the front. I like 3D touches.
Owen was excited to see all his toys and books piled in one sack and had fun pulling them out, one by one.
His favorite mode of transportation is definitely an airplane. We've flown back and forth to Calif many times and he gets excited when the airplane pulls up to the gate. "Mom! There's Jet Blue!"
So the book I love Planes! is right up his alley. It talks about all types of planes and flying vessels with bright illustrations. The boy in the book imagines all the things he'd like to fly in.
He has a cute imagination.
It's simple and sweet.
Next up....school bus eye candy. My kids have an obsession with yelling out "school bus!" when we see one driving down the road.
The book shows buses driving around town, through traffic, heading to bus-stops to pick up kids.
Then the buses drive through town, headed to school.
Eeeerch. Everyone off.
Then they're back out in traffic till it's time to pick the kids up again. (how great is that taxi and the man next to it? I love these illustrations!)
Finally, the buses take the kids back.
Home again.
Home again.
And a rare picture of my kids holding hands together. It was such an honest sweet moment, I had to capture it.
And there the book goes, home again in its new bag, ready to tote along wherever we go.
There's just something about schools and buses that makes me wish I was a kid again.
I guess that's the joy of reading books with my kids--reliving those memories and making some new ones. I'm glad we have 12 more years of it.

Thanks Katy for having me!
I'm excited to see the other creations over the next two weeks.

Wednesday, November 9, 2011

test test here

Friday, September 23, 2011

Pacifier Clip tutorial

Tired of baby losing her binky? Don't settle for what you see in the store. Making a pacifier clip is easy! And once you've made one, you'll want to make 20. They're the perfect accessory for any baby shower gift.
The clip attaches easily to a carseat, shirt, or stroller,
and the pacifier pops right into baby's mouth.
Life just got a whole lot better.

Okay, let's get started.
Since fabrics and machinery vary from sewist to sewist, we'll show two different methods for making your clips.

NEEDED:
* 14 x 2 1/4 inch rectangle (14 x 2 1/2 if not using a serger) of fabric.
Cottons work best - simple cotton, seersucker, corduroy, denim, etc.
* 14 x 1 1/8 inch rectangle of interfacing
* Small square of velcro
* Suspender Clips (easily found at most sewing stores and online. If you can't find any, other fasteners will work as well)
Start by cutting fabric and interfacing rectangles. If you're using a heavier cotton or corduroy, omit the interfacing. It simply adds thickness and strength to your "ribbon" part of the pacifier clip.

Your fabric rectangle should be 14 x 2 1/4 inches. It will eventually be folded in half to make a 14 x 1 inch long ribbon. You don't want your ribbon to be too bulky, so you only need one layer of the interfacing...or a rectangle that's 14 x 1 1/8 inches.

To make the entire cutting process easier, first cut the fabric rectangle and then cut the interfacing larger than you need....
Fold your fabric rectangle in half, length wise, and iron it. Then shove the interfacing piece right in the middle of the sandwich. It will be sticking out of the side. Then use your rotary cutter to cut the edge of facing, making it the exact size you need.
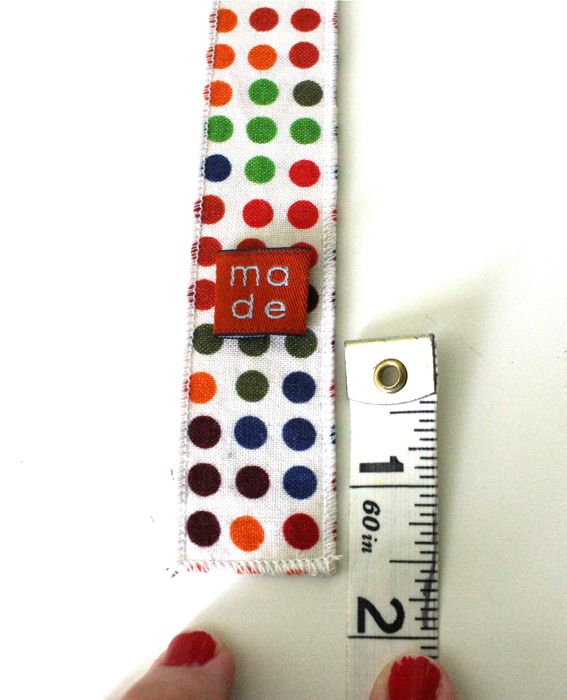
You're left with something like this:
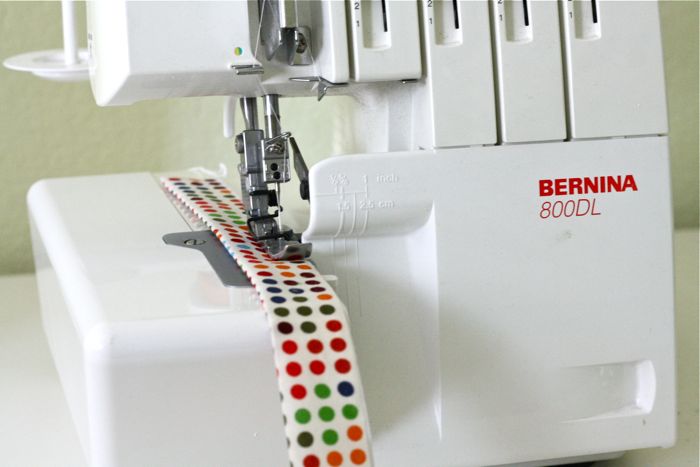
The easiest way to sew this project is with a serger. BUT, IF YOU DON'T HAVE A SERGER don't worry. Keep reading so you get the gist and we'll show you another method below.

Today we'll be using a ROLLED HEM. If you've never used one, it's easy. It involves 3 spools of thread and NO cutting hands. The stitch is very narrow and as you go, the edge of the fabric is slightly rolled under. This is a wonderful way to finish off silky scarves, dinner napkins, or a ruffled knit hem. Consult your user manual for all the details, since you also need to make adjustments to the differential, stitch length, tension, etc.

In my Bernina manual, these are the settings for a 3-thread rolled hem:
Set your machine up with a thread color that either compliments or contrasts with your fabric.
Practice on fabric a few times to make sure the machine is adjusted properly.
Then start at one end and serge all the way down one side.
Serge around the edges and back up the other side.
Clip off the hanging threads.
To keep the corners from fraying, use Fray Check or other anti-fray liquids.
Dab a very small amount in the corners and let it dry.
Okay, you're done with the "ribbon" part of your clip. Let's add velcro and a clip.

Cut a small piece of velcro, about 1/2 inch long. Hold it up to your serged ribbon and make sure it's wide enough to cover your ribbon:
Sew one side of the velcro square at the end of your ribbon:
And sew the other velcro piece about 3 inches down (this becomes the loop that will hold the pacifier).
I've just shown you the easiest method for sewing on velcro. However, your thread will show through on the other side of your ribbon.
Not a big deal if the thread color is camouflaged.
But if you want a more polished looked, sew on the velcro pieces in the first step, before serging down the sides. Open up your folded rectangle, place the velcro pieces just as you did in the step above, sew them down, and then continue by sandwiching the interfacing inside, etc.
Now we're going to sew a clip to the other end of the ribbon. If you have a personalized label or patch, you can add it now. I love a colorful added touch.
Grab one of your suspender clips:
Loop the ribbon through the end of the clip:
Fold it over:
And sew it down:
And you're done!
If you don't have a serger, here's another method....

Cut a 14 x 2 1/2 inch fabric rectangle and a 14 x 1 1/8 inch interfacing rectangle.
OR if you want a contrasting back to your ribbon, cut 2 fabric rectangles that are 14 x 1 1/4 inches. This is what I'll be doing here.
Remember that if you want a cleaner look, sew your velcro squares on now. Or you can wait till later.

Okay....
With right sides of your fabric together sew down one side of the ribbon, using a 1/4 inch seam allowance. If you're not using two fabrics here, just fold your large rectangle in half and iron it down (as we did above):
Iron out your seam:
Then iron each side in, 1/4 inch:
Place your interfacing right in the middle:
Fold over the "sandwich", and pin everything closed:
Sew down the side, very close to the edge:
Then sew down the other side, very close to the edge. This step is purely for aesthetic, so that it matches the top-stitching on the other side:
You can either fold the ends in and top-stitch them closed, or do a tight zig-zag stitch:
and snip off the edges:
Then fold it under to the "wrong" side of the clip and top-stitch it down, just to clean up the look.

Continue with the steps above to finish up your pacifier clip, and you're done!

Additional photos....