Tuesday, January 19, 2016

New VIDEO: How to make a Changing Pad Cover, from a towel

test

 It's a new week my friends!
A new day to sew a little something.  Or not.
Or to just watch videos of cute babies.

And I've got a new one for you....

Yep.  Let's make a new changing pad cover to spruce up that baby room!  All you need is a towel and a bit of elastic.  
It's so easy.  Cause just like making Crib Sheets, you don't have to settle for the boring options you see in the store.  YOU can make what you want!

And surprisingly, it took me till my last child to make one.
Why?  Do we do that?
Please don't follow in my footsteps.  I wish I had done this on baby #1
Ahhh. It's so cute!


I'll even show you some tricks to make that perfect towel, to fit your perfect style.
Cheers all around.


Okay just hit the Play button below and enjoy!

Thursday, January 14, 2016

TUTORIAL: Quote Totes

With so many fantastic quotes flying around these days, it's hard not to plaster them everywhere. Which is funny....because growing up, my Mom and Aunt often had quotes taped on walls around our house.  And they sort of drove me crazy.
Maybe because they said things like "D.Y.O.D. - Do Your Own Dishes." or "remember to flush."
And they were printed in some crappy Times New Roman font.

Well, times have changed (heh heh)
Great typography is everywhere!  It's almost overwhelming.
It is overwhelming.
But we can't resist!  It's so fun to share cool quotes and cute lettering!
Am I right?
Or am I right?
Now I've seen quotes screen-printed on bags and t-shirts.  But the other day I dawned on me...why not display quotes in the bag?....with paper??  So that the actual piece of art is sewn into the bag, so that it's part of the bag?!
Ah ha.
It's probably been done.
But I felt happy about it.
One small step for Dana.  One giant step for Dana.
So here you go!  The tutorial for making jelly quote totes.
It's got a great 80's ring to it.


Okay. This project is easy.
You just need a few items, and a few tips for sewing with vinyl.

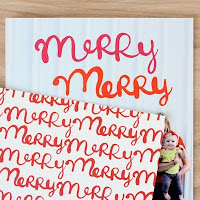
First, chose your artwork and print it to an 8 1/2 x 11 inch piece of paper.
There are so many great places to find artwork and quotes.  You can always make your own piece of art or encourage your children to draw/write something.  Or pinterest is plastered with images---just make sure you check the private policy on someone's artwork before printing.

One of my favorite places for interesting quotes and typography is Caravan Shoppe.  Their stuff is fantastic.  They offer downloadable art and toys in various formats so you can print a huge print for your wall, or small prints for a bookshelf.  Or in this case, so the artwork is portable!  Now you can share it with everyone as walk around with your plastic purse.

These particular tote bags were part of Lucy's birthday party, which was a Space Theme.  So the Outer Space quotes at Caravan Shoppe (here, here, and here) were perfect!  A few of them are even FREE.   Seriously. I love Caravan.

Next item: Vinyl.
For this bag we'll use both clear vinyl and solid-colored vinyl.
And if you've never sewing with those, don't worry.  We'll walk through some simple steps together.
And if you're wondering where vinyl is at your store, you've probably walked by it without even noticing!  The clear stuff is typically rolled like this, with tissue paper in between to keep it from sticking to itself.  And the solid-colored vinyl is probably in the same area in large rolls (near the home dec/upholstery area)
Clear vinyl comes in different "gauges" which means different weights.  I prefer a lower gauge (such as 4) for these bags because stiffer plastic will be hard to turn right-side out when you're done sewing.

• You need about a 1/2 yard of clear vinyl for your bag.
• You need an 1/8 of a yard of solid vinyl (for the straps).

• Start by cutting each handle 1 inch x 27 inches, using a rotary cutter, ruler, and cutting mat. You only need two handles, but I was mass-producing so I cut many.  The best way to do this is to cut one very long strip 1-inch wide (you can fold the vinyl in half while you cut).  And when you're done, cut each strap 27 inches long.  Now set the straps aside for a moment.


Let's talk about sewing with vinyl.  It's similar to sewing with Oilcloth.   It has a tendency to get stuck under your presser foot.

There are a few tricks to solve this:
1. Place transparent tape on the bottom of your presser foot.
2. Use the "tissue paper" method.
3. Use a Teflon Presser Foot.

Each of these methods are outlined in detail HERE.
My preferred method is a Teflon foot. It's inexpensive and can be purchased for most machines.  Just snap it right on and you're ready to go!

• Sew each strap by folding it in half (don't pin) then sew straight down .

Set the straps aside for now and let's work on the bag itself.

• You need 3 identical pieces of clear vinyl for the front and back of the bag.  The front is made of two pieces of vinyl, with the paper artwork/quote sandwiched in between.  And the back of the bag is just one piece of vinyl.

You can make your bag any size to accommodate any artwork.
I cut my pieces 15 x 17 inches
The best way to do this is to cut a long strip from the vinyl with scissors first, about 18-19 inches wide, to give you some wiggle room.  Then go to your cutting mat and cut 3 pieces that are 15 x 17 inches. 
• Take two of the pieces, remove the tissue paper, and sandwich the piece of artwork inbetween the two vinyl layers--make sure nothing else slips in there! like a piece of lint, hair, threads, etc.

• Now sew around the artwork paper so it stays in place.  You don't need to pin anything (and you shouldn't place pins in vinyl because it will leave holes).  The vinyl pieces actually sort of "stick" together making it easier to sew.  Sew around all four sides of the paper.
Now sew a hem on the top of the bag pieces.  Typically when making a tote bag, I sew the hem last so the side seams are enclosed nicely.  But it will be too difficult to do that later, due to the stiffness of the vinyl/plastic.  So well do it now.

• Fold the top of the bag under about 1 inch and "finger press" it in place (you don't want to iron vinyl).  Sew it in place.  And do the same thing on the back piece of the bag.

Now let's sew the straps in place.  Measure in about 3-4 inches from the sides of the back and clip a strap to the front of the bag.  Again, you don't want to use pins or they will leave holes.
Instead, I LOVE Wonder Clips!
• Sew each strap in place by sewing a small rectangle around the ends of the straps. For more details, watch my Tote Bags video HERE.   First sew the strap to the Front of the bag, then sew the other strap to the back of the bag.  Make sure the straps aren't twisted!
• Then, with right-sides of the vinyl together, Wonder Clip the sides of the bag together and sew down and around the sides and bottom of the bag. 
We're almost done!

• Trim the corners of the bag, turn the bag right-side out, and press the corners out as best as you can.

* This is going to be awkward to do.*  Not gonna lie.  It will feel really stiff and like it's not going to work.   But just get in there, crumple it up, and keep smooshing it around.  The artwork will get crumpled in the process! But that's part of the charm!
Annnnd.
You're done!
I'd say you shot for the moon and succeeded.
Good job.


Tuesday, January 12, 2016

Building a new home: Living Room improvements


With the new year here I'm jumping back into home projects.  Because I don't know about you...but I sort of have to be all in, or all out.  If I'm in home mode--I'm in home mode.  Or if it's pattern-making time, I'm in the studio drawing and sewing.  It's hard to be pulled in multiple creative directions---which is why we often have cereal for dinner.  Remember those details?

Well some of you have asked about a home update on Instagram (@danamadeit) so here are some changes in the living room.

And if you've missed any of my previous home building posts, here's the short version:
Two years ago we built a custom home in Austin, Texas.
And for the next thirty years, we'll be decorating it. 

Check out my previous posts documenting the whole process:
We’re building a new home!
Groundbreaking Party
From foundation to frame 
Stucco, shingles, and Exterior Paint
Interior Paint colors and the back Deck
We moved!…and an ode to the old house
Backsplash, Shower Tile, Flooring, Countertops
The giant Ball Chandeliers and other lighting
Guest Room makeover 
Mosaic Bathroom Tile and Wallpaper
New Dining table, benches, and chairs
Large Craft Table for the Studio


So the day we moved in---ON Valentine's day. How sweet is that?---the room looked like this.
(Read more about our gray + white paint colors, our fireplace + tile, and our floor tile)


The gray couches we bought in California 6 years ago, right before we moved here.  Actually they were delivered to us IN Texas and there were major delays, so we sat on camping chairs for a few months.  And those are fun memories.

So the couches work great in the new space.
Next up: the rug.
I love this rug!  It's from West Elm.  And I found it at the outlet (in San Marcos if you live in Texas)  It's 9x12, which works great in this room.

Most of all it doesn't shed like 10 cats in the house, like the last rug did.  Casey was happy to get rid of the "tauntaun carcass" as he called it.  
Next item: piano.
The kids started taking lessons a couple years ago, so it was time for one.
We found this beauty on Craigslist, which was cared for by a piano tuner and restorer.  He had also had an amazing baby grand in his workshop which he was restoring from fire damage.    
He brought the piano to our house, tuned the thing, and played some amazing music...which reminded me of how I'd like to be Lady Grantham one day.  Because I could use a household of cleaning help and I'd love to have a private musician play for us upon request, in the parlor.
If we had a parlor.

It was hard finding the "right" piano that fit within our budget.  Obviously I wanted it to sound decent, which it does, but it's not great.  But I also wanted the style to be simple and not too swirly or ornate.  And I LOVE the way this one looks.

And of course I wasn't sure about the brown color at first.  But as I mentioned with the dining room table, I'm warming up to browns again.  Or rather, I think you can mix browns and grays together nicely.
I toyed with the idea of painting it because I've seen so many cool versions....
And once we got a new TV console, I loved the brown next to the white.
And once the crappy piano bench that the piano came with broke one day (phew) I pulled the IKEA bench over and I loved it even more!  This combo works great together.


It's hard to pick out a full room of furniture.  
Well, maybe not if you're an interior decorator.
But I find that starting with the key pieces that are either large (like a couch), or important/special (like a piano), or by purchasing a furniture item that really jumps out at you (like this TV console I loved the first time I saw it)....well, those are good places to start.
And then you can slowly work your way through the room, piecing it together.  And by the time you're done, you'll be sick of it.
Haah!
Isn't that how it seems to happen?
But then you can sew new pillows, throw up a new family photo and call it good.

Okay.  Here's where I need your help and input.
This little chair.
Or rather, this space where the little chair sits. 
The chair was great in the old house.  Remember how I had to redo the china cabinet before I could open it?  Well I still love that chair.   It's just too small for this room and I can't buy another.
(I miss the old house)

So it's time for a new piece of furniture.
And I have looked and looked for months...and almost hit purchase multiple times.  And then I'll chicken out, or someone else will give me a different opinion.
So I'm hoping you can help steer me in the right direction!

Here are some choices I've narrowed it down to.  You'll find links to all of these on my furniture board.  
This area of the room definitely needs more seating to pull the socializing aspect together.  So it's either two chairs, a love seat, or settee.  My two favorites are the green settee and blue chair above.  I love the yellow loveseat way too much.  But it's also too large for the space.

The coffee table is also going away and needs to be replaced with one rectangular table, or two squares, or rounds?  I don't want the room to become overly mid century modern.  But I do love many of those styles.

There are plenty of yellows, greens, and blues throughout the house.  So any of those shades work.
(read more about lights, wallpaper, shower tile, exterior paint)

I worry that the green couch will be a lot of green near the door.   But it all depends on which angle you looks at it.

AND I think I might replace that white bench behind the couch with some upholstered benches?  Maybe those could be yellow?

I'd love to know your thoughts.
Which one do you like?
Or share a link to something else!  I'm open to new ideas.


And already since taking these photos, I've added some new plants and artwork to the room.

But I'm still searching for more.  I can't stomach the price of these Gray Malin prints, so I'd love to know if you have any good artwork leads!
Baby steps to home improvement.


Friday, January 8, 2016

a Merry 2015 Christmas Card from our family to yours

http://www.danamadeit.com/2013/01/cheers-to-a-new-year.htmlhttp://www.danamadeit.com/2013/12/a-merry-2013-christmas-card-from-our-family-to-yours.htmlhttp://www.danamadeit.com/2015/01/a-merry-2014-christmas-card-from-our-family-to-yours.htmlHappy New Year friends!
I hope your holidays were a much needed break from the normal routine---but still packed with parties, gifts, and treats.  I'm pretty sure I gained 5 pounds in donuts.
Mmmm. Donuts.


My husband is on a personal quest to find the best donut shops in the US.  And since we took an impromptu trip to the South....well....there were more donuts to eat.
But we'll save the South for another post.
Back to Christmas card mayhem.

You know it's funny, for a few years I never did Christmas cards---I'm not really sure why?  I think it felt like such a time commitment.  And it totally is.  But one day I decided that it's kind of like giving a small gift to all our friends.  And I often feel like I should stuff each envelope with little stickers or something extra that our friends can use?  Maybe next year.

So.  After four years of consistency, I guess I can say I'm a Christmas Card person. 

It's really fun to look back and see how our own kids have grown.
And how some things never change.
As you all know too well... it's a hassle to wrangle them in.
There are plenty of motivational speeches (candy bribes),

Encouragement,


Presumed innocence,


And threats.


Doh.

So this year we just want to say: we feel you.
Through the good, and the chaos.
Because you love 'em to death.


and as the song says....

From the Willard family to all of you:
Merry Christmas!
Happy Holidays!
And hooray for a New Year!

Thank you for being part of the adventure with us. 
Here's to a bunch of sewing, and making, and spending time with your families this year.
Cheers!


Check out our Christmas cards from past years by clicking on an image: