Friday, April 12, 2013

TUTORIAL: Tin Can Caddy for Earth Day and Mother's Day

Everybody loves a good tin can project, right?
So. many. options.
And today I'm teaming up with 3 other bloggers: Make and Takes, Prudent Baby, and Petit Elefant and a great online site called Consumer Crafts to share a craft that works for Mother's Day....and Earth Day.
 I basically went from this pile of fun:
to this....which you could even stop right there, filling them with mom's favorite flowers, plants, or treats:
Or you can lash a few cans together with twine and rope to create other fun options:
 (which should definitely include a few Dandelion pom poms)
Okay, you only need a few supplies which are all found on consumer crafts.com.  And I gotta say, I was really impressed with the selection on their site.  They have party decorations, art supplies, stuff for kids, all your basic craft needs....even American Girl-ish doll clothes! (Lucy's excited)....oh and Perler Beads! (Owen's excited)

Now you could use spray paint for your cans.  But I found that acrylic paint has a bazillion more color options, is cheaper, and more Earth friendly.  Ding!  I also found that mixing the paint with a bit of glossy Mod Podge gives the dull paint a bit of shine and adheres to the cans a little better.

So grab your mod podge, paint, bakers twine or hemp, brushes, and whatever cans you have lying around.
I love using old baby food containers for mixing paint because they're just the right size, and have lids.   So in a small container mix equal parts Mod Podge and acrylic paint.  Then start painting it on your dry, clean can.
I found that painting worked best in layers, using a blowdryer to dry between each layer.  Some colors needed about 3-4 coats of paint.

And just like that you've got a rainbow of tin can beauties!
Seriously, these colors just make me happy.  
Now let's lash or link a few together.  This reminds me of my Girl Scout days when we lashed 4 boogie boards together with rope and made a big raft at the beach.  Totally fun (and I guess pretty impressionable to a 9 year old).

So from this totally messing photo diagram below you basically want to start at one can and do Figure 8's around the other cans. Wrap one way direction on the first can, then wrap the other direction on the next can, then go back and forth between the 3 cans, etc.  Don't always follow the same path on the same can so you can vary the way the cans are linked together. 
Do the same method on the bottom of the cans and you've got a cool silverware caddy for a summer party.
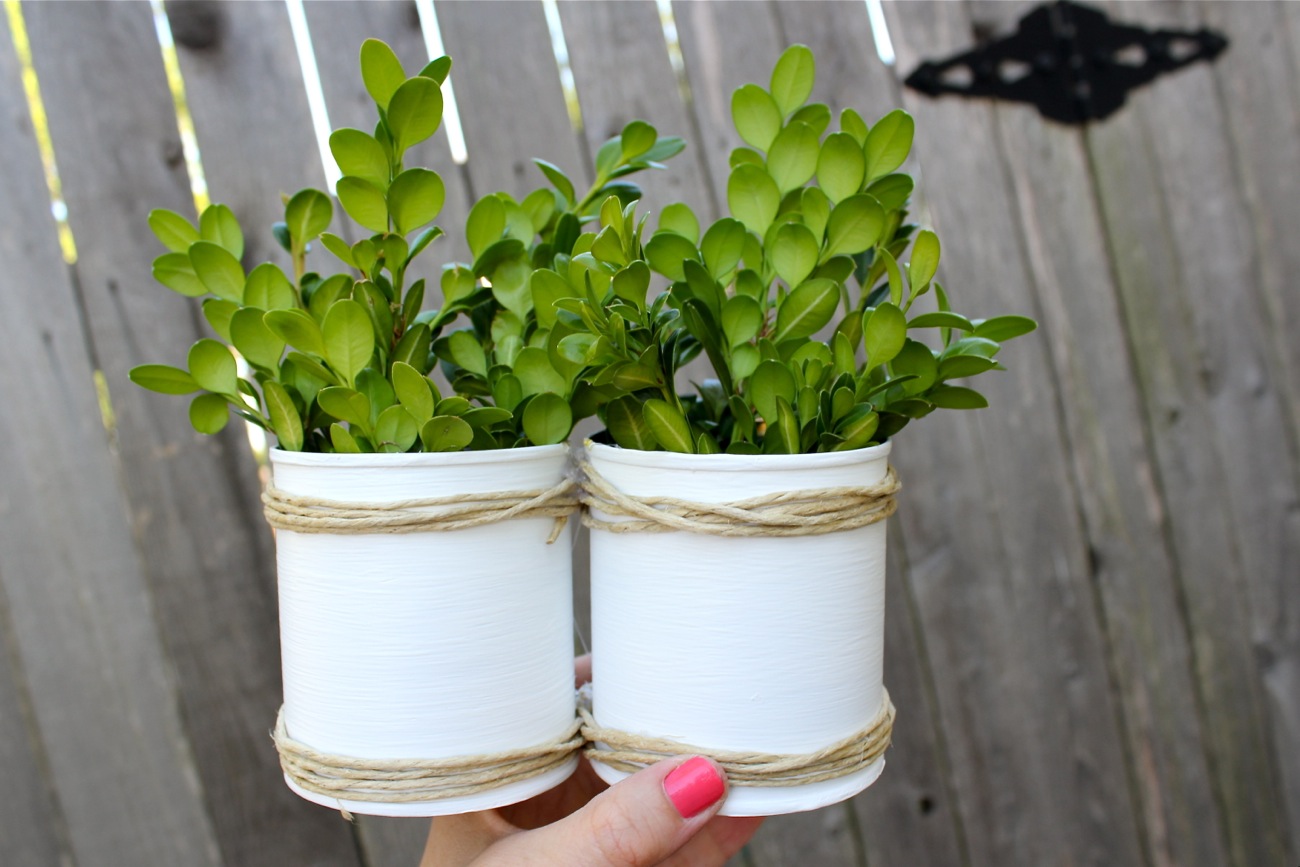
Now using the hemp rope is a tiny bit trickier only because it can be kind of stiff (softer, pliable hemp is ideal).  For two cans, dab a bit of hot glue on the first can to hold the rope in place, then wrap it around and over to the other can in a Figure 8.  Wrap the rope a few times, then cut the end and glue it in place (hide the ends in-between the two cans).  Do the same for the bottom of the cans and then shift and shimmy the ropes till they're right where you'd like.
Boxwood plant vase!
For the Craft Caddy, let's lash 8 cans together.
Start by linking 4 cans and 4 cans separately (this makes the whole thing easier to manage).  Then put the two lines together and weave in and out around the 8 cans.  Some of the cans may shift so do your best to keep them straight (as you can see, I did not.  But it works).  Then lash the cans together at the bottom as well.
 To make the little handle....
Braid 3 strands of hemp together, stick one end of the braid in between the last two cans and hot glue it in place.  Do the same on the other end of the cans. 
Then fill the caddy with your favorite supplies!
 And carry it wherever the crafting may go.
Any mom would love a colorful tin can surprise on Mother's Day.  I'm sure. 

And for even more options, check out what Marie from Make and Takes did with washi tape:
And we've got two more Earth Day DIY projects, sponsored by Consumer Crafts.....
Upcycled Carnival by Prudent Baby.
 And T-shirt Necklaces with Petit Elefant:
And for a ton of Earth Day DIY ideas, check out our Earth Day Pinterest Board.

Okay. One last bit of fun.  Want free money to Consumer Crafts?....enter with the rafflecopter below for your chance to win a ConsumerCraft.com bundle worth $250, so you can get started crafting up a storm for Earth Day DIY! Be sure to visit ConsumerCrafts on twitter, facebook, and see their Crafts Unleashed blog for more craft ideas.
a Rafflecopter giveaway
————————————————————————–
This is part of Celebrate MOM, a series with gift ideas for moms and women.

Here’s what we’ve shared this week:
• Dishtowel and Napkin Totes
• Fabrics A to Z book Giveaway
• Dandelions Pom Poms
• the Vintage Pearl Giveaway 

Wednesday, April 10, 2013

TUTORIAL: Dandelion Pom Poms

I've wanted to make these for two years,
...ever since Lucy, Owen, and I stumbled on a grassy field full of dandelions.  The kids were dying!  I was dying.  It was so fun!  And so cute.  Isn't it odd that a weed flower can be so adorable and entertaining? 
 Who can say no to this?
Or this?
Dandelions that never wilt or die.  Of course you can't blow them away but you can still make a wish....and decorate your house.
Okay.  This is real easy.
It's the same pom pom tutorial I shared a couple years ago but we're adding a stick, and using a speckled yarn.  You can also use pure white yarn but I really like how the flecks of dark mixed with cream give the dandelions an earthy texture.
 No special pom pom tools needed.  Just use your hands and some yarn!
1. Start wrapping yarn around 3 fingers.  For smaller poms use 2 fingers.  For larger poms use a book or something wide and be prepared for a ton of wrapping. 
2. Wrap till the ball is pretty full
3. Carefully slide the ball off your fingers and lay it over a separate piece of yarn
4. Tie the yarn string tightly around the center of the yarn ball
5. Use scissors to cut all the loops on both sides
6. Give the pom a hair cut.  Keep trimming till all the sides are fairly even (doesn't need to be exact)
7. Insert a wooden dowel (found at most craft stores), or a wooden skewer or pencil, or candy stick, whatever works.
8. Squeeze a bit of hot glue on the end of the stick
9. Carefully push the stick into the center of the pom pom

And there you go.  Dandelion Pom Pom
Stick some in a vase and you feel like a kid again.
--------------------------------------------------------------------------
This is part of Celebrate MOM, a series with gift ideas for moms and women.
Here’s what we’ve shared this week:
• Dishtowel and Napkin Totes
• Fabrics A to Z book Giveaway

See you tomorrow!

Monday, April 8, 2013

Celebrate MOM and TUTORIAL: Dishtowel and Napkin Totes

Can you believe Mother's Day is just around the corner?  I can never keep up with the holidays.  But this month I'm trying!  So let's get the ideas flowing and let's Celebrate MOM!  This is a series I hosted a few years ago with Disney of Ruffles and Stuff and throughout this week (and maybe part of next)  I'll share simple Mom-gift projects with you (it might not be every day but I'll try).
The first Mom gift that comes to my mind is a tote bag....maybe because I never tire of making them or browsing the bag aisle at Target.  I've shared a series of tote projects in the past, starting with the Basic Pocket Tote (click a button below for details):

So let's add another twist.  Let's make bags from dishtowels and cloth napkins! (because I also can't resist the kitchen aisle at Target as well).
Now of course you can always use fabric to make these tote bags but the cool thing about using dishtowels and cloth napkins are:
A. Freaking cute fabric options.  I mean, Orla Kiely dishtowels?!  YES.  The towels look darling with the 5 Orla Kiely soap dispensers I gobbled up too.  Actually....how about gifting the bag WITH a soap dispenser inside?   Done. 
B. You don't have to finish of any of the edges.  Everything looks fancy shmancy inside like you're the professional that you are.
C.  Why not?  It's just easy.

So grab whatever towels and napkins you can find in your cupboards, the store, or even the thrift shop and let's get sewing.  We'll follow the detailed instructions from the Basic Tote and Boxed Out Tote tutorials. If you've never made a bag please read through those tutorials first.
Okay.  Use whatever your towel has to offer when making your bag.  If you want a large tote, sew two towels together.  If you want pockets, use fabric from another towel (if they come in a set) or grab fabric scraps, etc.

For this bag I folded the towel in half (right sides of the fabric together) and sewed down one side and the bottom.  Sew just to the left of the finished towel edges for a nice clean look and so your machine doesn't have to work as hard.
OPTION: you could also choose to the sew with the wrong sides of the fabric together and sew right on to the outside of the bag, with the finished seams poking out.  Could be cute.
But NOTE: store-bought towels and napkins are not always perfect and symmetrical so outside seams don't work unless the edges line-up fairly well.

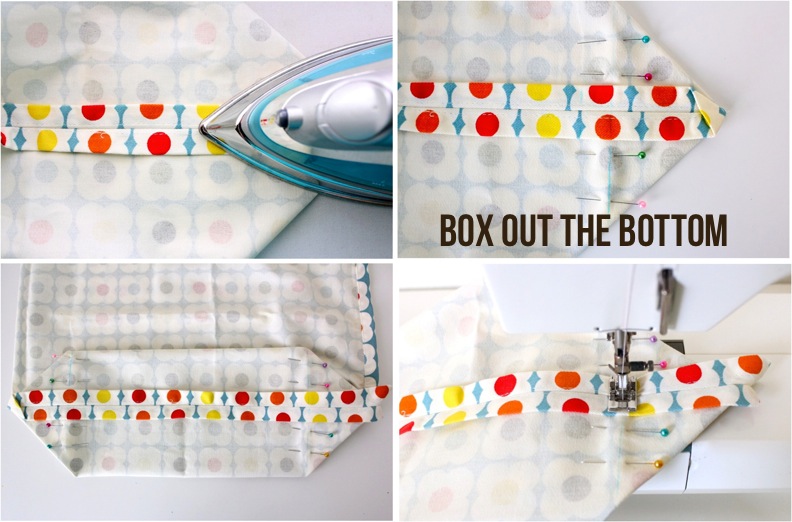
Follow the Boxed-Out tutorial for boxing out the bottom of your tote if that's what you're going for. Or just leave it as is!
When I finished sewing the sides and boxing the bottom, the tote was still a bit long, so I folded the top over a good three inches, sewed a chunky top hem, and attached the straps (according to the Basic Tote tutorial)
Simple, cute dishtowel tote:
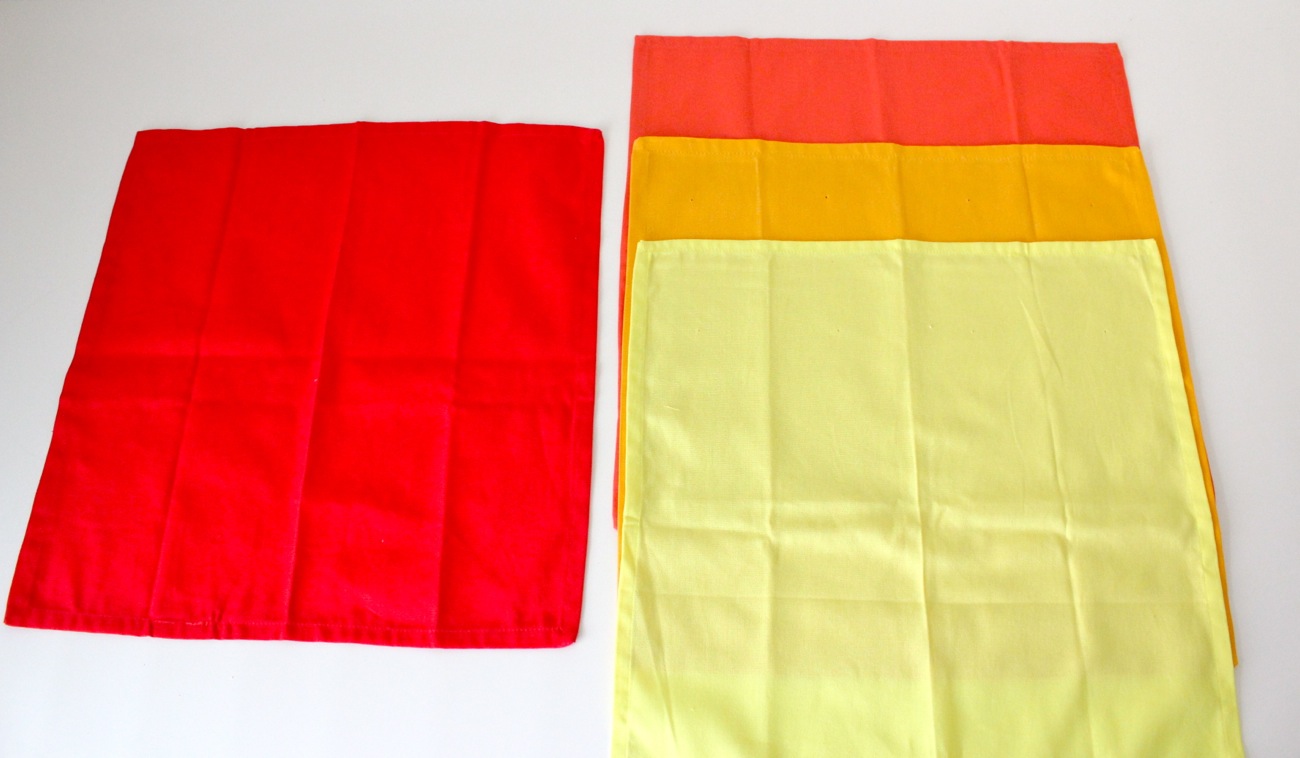
Now let's try napkins.  Is there any wonder how these ended up in my cart?  There was a blue/turquoise ombre set too.
But I resisted.
(Pat on the back from Casey.)
Cloth napkins are great because typically they come in a set of 2-4 so you can use them to create fun pocket layers in your tote. Tons 'o options.
I laid these napkins out many different ways trying to visualize the best tote...and asked Casey for his input too.....and wondered if I should do a big pocket on front and a big pocket on back?
And I finally decided to keep the ombre gradient and sewed three napkins together for the bag front and used a single layer for the back.  And it was perfect!
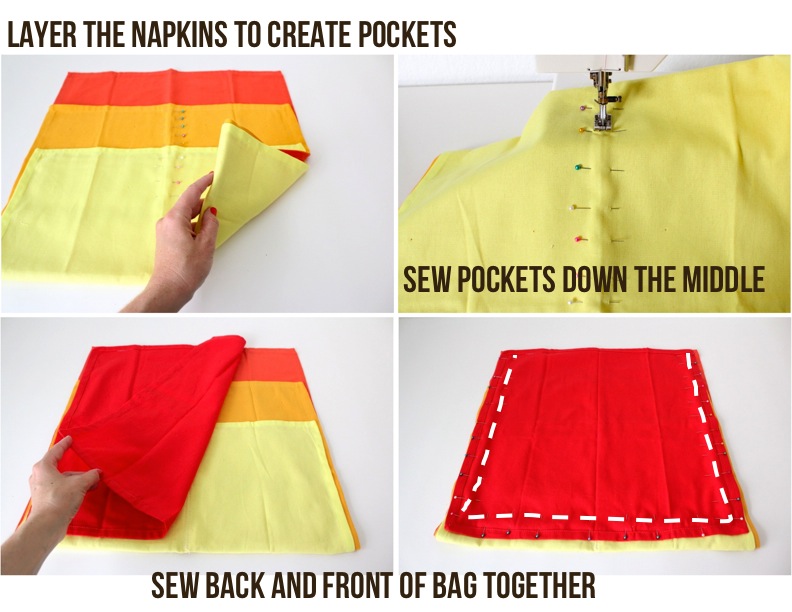
So.  Layer the napkins and fold the excess under the base layer to the back side (this means you'll have some pockets on the inside of the bag too!)  Pin all the layers together down the middle of the bag, or wherever you'd like the pockets to be.  You could break it into 3 front pockets or 1 big pocket on the yellow layer and 2 pockets on the orange.  Just decide what you want and sew in layers if needed.

For this bag, I used the folded crease that ran right down the middle as my guide (iron your towels down the middle if needed).  I pinned all the layers together making sure the back layers we're pinned as well, then started at the top of the orange pocket and sewed right down the middle to the bottom of the yellow napkin.
Then I laid the red layer over the top (with right sides of the fabric together) and sewed around the two sides and the bottom, sewing on the inside of the finished napkin edges for less bulky sewing.

Now because you have so many layers sewn together, you inside seams are going to be a bit bulky and it will be harder to push the corners out.   But.  I actually kind of like that.  It gives some weight to the bag and it keep shape nicely.
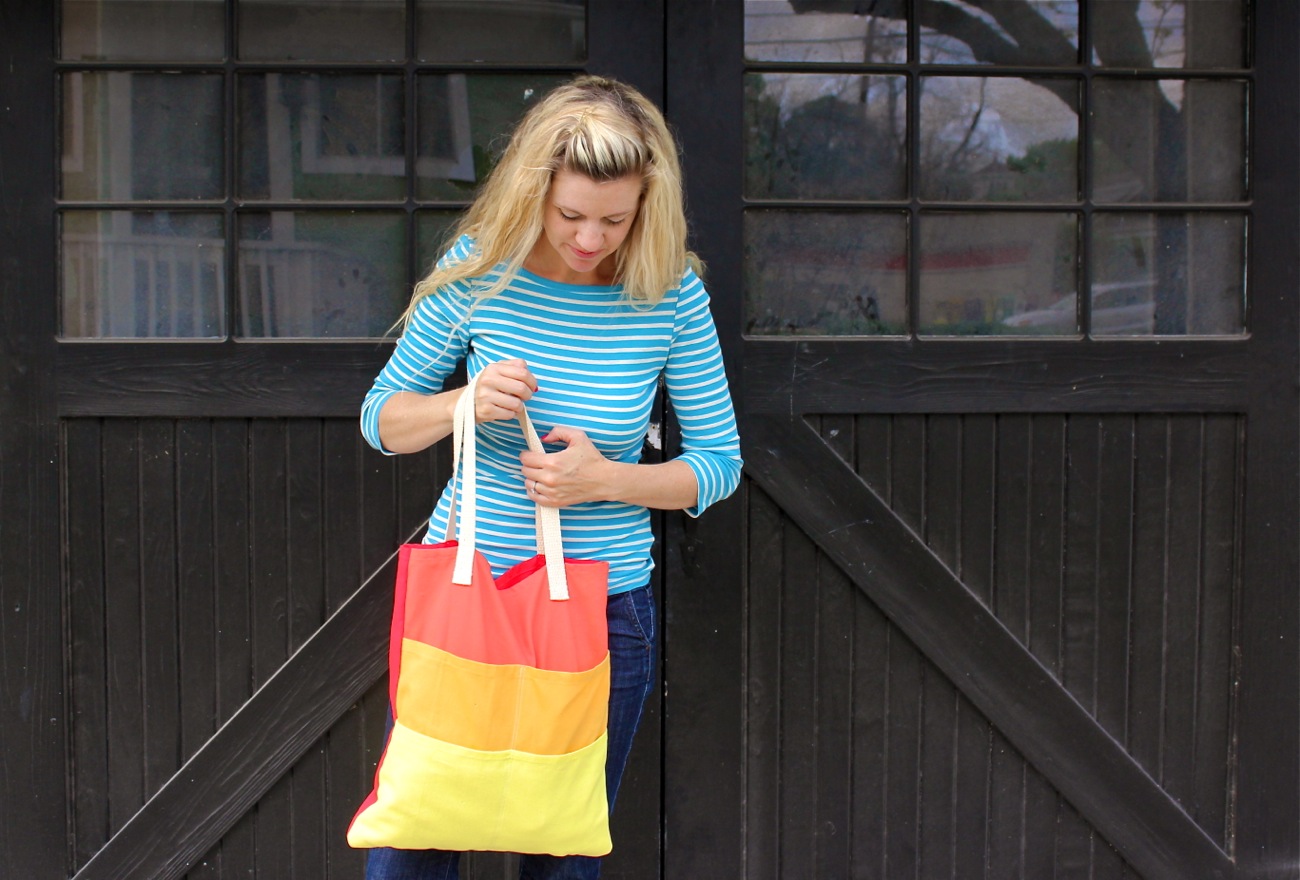
There you go!  Ombre napkin tote with lots of pockets.
My kind of bag!
To give as a gift, fill it with her favorite magazine, candy, lotion, or favorite yummy treat.
And you've got a happy mom!
...and little bumble bee.
Thanks for joining the shoot little dude.
Come back during the week for more Celebrate MOM tutorials!

Wednesday, April 3, 2013

good men are good to find

This isn't the post I was going to write today.
But I'm just going to talk about my husband for a bit.
Because Casey is the reason I'm able to have a blog and be a mom.
He's always been supportive about what I'm doing and is a great hands-on Dad so I'm able to leave for the weekend to go to Alt or spend evenings and Saturdays at the library working on my book, while he plays Mr. Mom at home.  
I know many of your husbands are the same.  Good men.  Good dads.

And I was thinking about this when I posted pics last night on Instagram (find me @danamadeit) of an amazing 9x12 foot plush West Elm rug I scored at the Pottery Barn Outlet.  It was originally $900 and I got it for $90! for the new house!  YES!   I showed it to Casey and he said, "it looks like the inside of a Tauntaun."
Which, if you are geek enough to agree with then I guess I applaud you because yea, it kind of does.  And it only took both of us and a wheelbarrow to move the dead carcass from my car to the garage. 
I think his face sums it up.
But I'm totally excited about the rug!  The workers warned me about it shedding like crazy.  But for $90 I'll take my chances and vacuum constantly and my friend said that after 6 months hers stopped shedding. Thank you Tauntaun.

And thank you Casey.
And here's the semi-serious point I guess I'm trying to make.
Casey is a good husband and puts up with a lot of my shenanigans.

When I think about the ridiculous times I've said something like, "okay, can you load Owen's bed into your truck so we can go take photos by this blue warehouse across town?....and he just gives me that funny "what?" look (above)  but then shrugs his shoulders and starts loading the truck....well, I just have to smile at how cool he is about all this bloggedy blog blog stuff (as he calls it).  He never judges or asks why the heck I need to go to Joanns one more time,....and has sat in the car how many times? when I say, "I'm just going to run in for some white thread" and 20 minutes later I come out with a bag full of pleather and grommets.  He's an excellent sounding board and helps me work through decisions about which opportunities to say yes to and which to let go of, so I can balance our family life and not be an insane stressed out person.  He even takes photos of me when I need to be in the shot, and patiently listens while I explain the angle I'm going for.  He's just really great like that....mostly because that's who he is and also because he sees how much I love what I'm able to do and wants me to have that creative outlet.   And, he's always up for an adventure.  Always.
That's actually one of my favorite things about him.  He always wants to "do stuff".   He loves to travel the world and explore new places, try new things.   He's a super fun dad and wrestles with the kids while I feel like pulling my hair out.  Every kid loves Casey.
He's a busy man, works hard, teaches a seminary class to the youth kids at our church every morning at 6am and then goes off to work.  He loves University of Arizona basketball more than life, and rootbeer....but when it comes to rootbeer he's on a quest to try every local variety we can find.  He's a statistician and loves numbers and equations.  When I hear him talk to coworkers on the phone I know he's speaking a foreign language my brain will never understand (which is why I got a C in my college stats class).  He's funny, cute, dorky (but good dorky), and apparently he likes to wear his red shirt. 
I'm a lucky girl.

I know it's not Father's Day but it just seemed like a good day to point out the great men in our lives.
Thank you to the other dads and husbands out there who are loving their ladies too.

Okay, over and out.
Next post, sewing and DIY.
Thanks for letting me get mushy.