Hello again friends. It's Dana from
MADE and I'm back to share a sewing tutorial and free pattern with you!
When I discovered that Spoonflower carried
knit fabrics last month I was overjoyed! Truly! I'm a fabric nerd. And as most of you know, finding cute knit fabric prints in the store is pretty impossible. But at Spoonflower the prints are endless! Holy fun.
I narrowed down my favorites to only 3 prints (
Love Fiesta,
freeform arrows in lipstick, and
umbra_star_brown). And because the knit fabrics
are pricey I've created a project that only uses
one fat quarter of
fabric! (the smallest amount that can be ordered for knits)
Today we're making:
These are so fun and cute, they're hard to resist.
I'll show you THREE different versions.
Let's get started!
First, start by downloading my free pattern HERE.
• Print the 4-page pattern to standard 8 1/2 x 11 inch paper. There is a 1 square-inch measuring box on each page to make sure your pattern has printed to proper size. I recommend selecting the print option "actual size" (or something similar) for best results.
• Cut out all 4 pattern pieces (2 Back pieces, 2 Front pieces). Tape the 2 Front pieces together along the dotted lines. Do not overlap them, but butt them up right next to each other at the dotted lines and tape. Do the same for the Back pieces---match them up at the long dotted lines and tape.
• The pattern size is 6-12 months. If you have an older (or younger) child you can adjust the pattern by extending or reducing in a similar pattern shape. Use one of your child's current shirts to gauge how wide and how long the tank should be.
SUPPLIES:
• Fat Quarter of fabric - knits or lightweight woven cottons
• About 1 1/2 yards of 1/4 inch wide, double-fold bias tape (read more about Bias tape
HERE on my site)
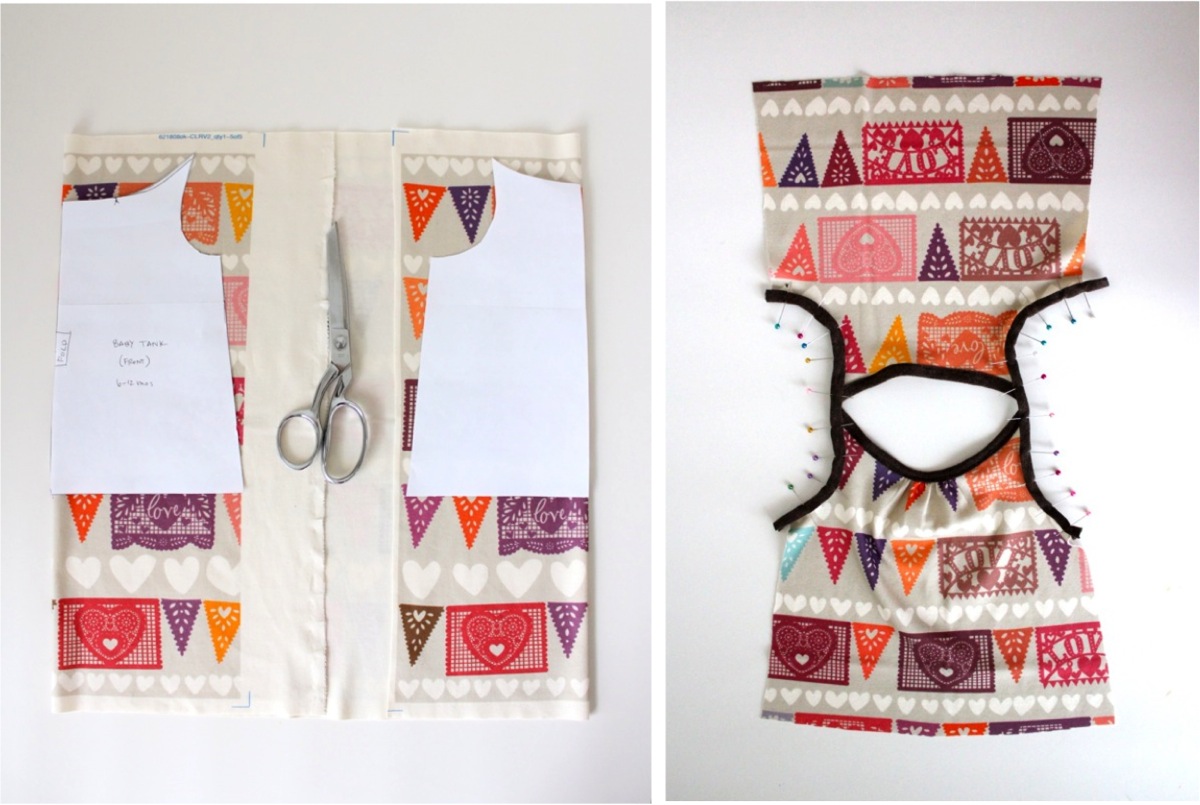
Determine the direction of the print on your fabric before you get started. This is important when ordering from the spoonflower site, so the tank top can be cut as shown below. The pattern has a front piece and a back piece. Fold the ends of your fabric in and place each pattern piece on the fold and cut one of each. Then using a fabric pen, place a small dot on the front of the neckline where the marking is shown on the pattern piece. Flip the pattern piece over and place a marking on the other side of the neckline as well. This indicates the gathering area for the front of the tank.
Place the Front and Backs aside and let's prep the bias tape.
Now don't let this part scare you. If you've never made bias tape or don't even know what it is, read all about it
HERE. And I've got good news: we don't need much bias tape. It doesn't need to be continuous, it can be cut from scraps, and if you're using knits you don't even need to cut it on the bias! (the diagonal).
I've found that using knit scraps for the neckline binding is the softest and cutest. But it's also a bit more demanding to work with. Bias tape made from woven cotton is easier to work with but feels more stiff. If you're a beginner sewer, I recommend making bias tape from woven cotton first (or buying it at the store) and then moving on to knits after that.
Okay, you'll be attaching the bias tape binding around the neckline and armholes in separate pieces. So I cut SIX knit strips from an old T-shirt, making each one long enough to cover the neck or armholes, plus extra length for ties at the end. Use a small
bias tape maker to help you iron the binding into "double-fold tape".
Now let's sew the binding and tank pieces together. With this tank I'll show the "cheating" method (as outlined in
THIS tutorial). If you want more control over the bias tape I'll show the "proper" method for attached bias tape in the next tank top.
First gather the middle of the tank Front, from marked point to marked point (read more about gathering
HERE). Then sandwich your first piece of binding around the Front neckline and pin it in place. Do the same on the Back of the tank.
Using matching thread color, sew the binding around the neckline. It's easiest to leave an overhang of binding on each side so you have more control over the fabric when sewing to the ends. Remember not to tug your fabric as you go but let the machine feed it naturally. When the bindings are sewn, fold the Front (and Back) in half and trim off the excess binding ends.
Then in similar fashion, sandwich binding around the armholes, leaving long ends so you can tie the bindings at the shoulders. Sew the armhole bindings in place.
Place right sides of the tank top together, pin them together and sew down the side seams using a 1/4 inch or 3/8 inch seam allowance (I prefer 1/4 inch). Iron out your seams and if you like, finish off your seams with a zigzag stitch or serger....or just leave them as they are! Knits don't fray so you can leave the edges raw and they're just fine. Around the bottom of each armhole, however, sew the seam open so it lays flat and is not irritating to your baby's arm (sew right over the binding and just go back and forth a few times). Then tie the binding ends together at the shoulders. You can tie them in bows or knots. Then trim any excess.
We're almost done! Iron the bottom of the tank under about 1/2 inch and sew your hem in place. I always sew a 2nd parallel line next to my first line to make it look more polished.
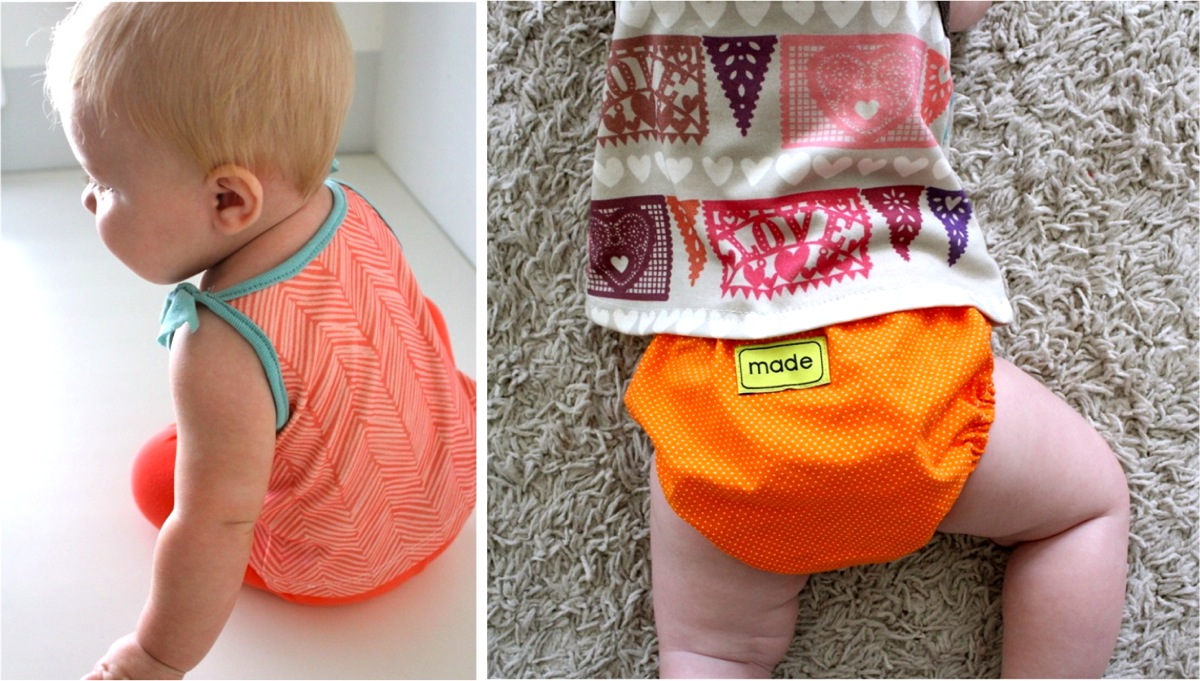
And you've got a cute little tank! (with a personalized
MADE label on the front).
Now let's try it with a single bow on the shoulder and the proper method for attaching the binding.
Cut your pattern pieces as outlined above. For this tank I created 1/4 inch bias tape from
woven cotton (rather than knits).
To attach the binding....first, unfold the bias tape and pin the
right side of the tape to the
wrong side of the fabric. That will feel weird at first, but trust! Sew it to the neckline, sewing right along the ironed fold (about 1/4 inch from the fabric edge). Then fold the binding over the neckline and pin it in place on the right side of the fabric. Then sew it in place. This ensures that the binding is perfectly sewn to both sides of the fabric.
Please NOTE: I found that using this method for the Front gathered neckline was not as effective as it was on the rest of the tank because I had less control over the front gathers (some of the gathers folded over each other under the binding). So, for the Front neckline I recommend the sandwiching method we used above.
Now, sew the armhole bindings using the same "proper" method. We're going to sew one of the armholes as separate pieces, and one of the armholes together. So...lay the Front and Back of the tank top head to head and
only sew bindings to the Right armholes first. For the left armhole, we'll attach it as one big piece, so that the Front and Back are attached in the same binding. Use the proper method above to sew it to the armhole.
Then tie the tank together at the shoulder and you're done!
Okay, one final look. I just couldn't pass on the
Love Fiesta print. I want to drape it in my baby's room it's just too cute!
For this tank I sewed both armholes closed (no ties) and used knit scraps for the binding. After trying many of these tanks on baby Clara, I realized that they fit fine without needing to open at the shoulder. So, attach and sew each armhole as outlined above.
One more baby tank!
The only thing cuter is a
perfect diaper cover to go along (detailed info and free pattern in the link)
Then comes my favorite part, mixing and matching.
I love making and buying separates for my kids. If I sew my daughter a skirt, I often buy her a basic Tee to go with it. Or if I make the shirt, a simple pair of leggings and jeggings are perfect. Now Clara has a 6-part ensemble to play with:
or just bum around.....
I'll be making these by the dozen for baby gifts.
For more detailed tutorials like this one, check out my
TUTORIALS and
PATTERNS on
MADE.
Have fun sewing!
And thank you
Spoonflower for the gorgeous fabrics!


No comments:
Post a Comment